It has been quite long time since I did lot of SQL queries and recently had to get myself in one such task. There were some long set of queries to be executed in a loop that is supposed to run for around 50 times with different set of results.
With some search/research I found a quick solution using SQL Cursors and thought of sharing the same.
Example:
The scenario was as below:
DECLARE @Var1 NVARCHAR(100)
SET @Var1 = 'Some value'
SELECT VALUES FROM TABLENAME WHERE VALUE = @Var1
.
.
.
...-- many other similar queries using the value of @Var1
The challenge was to keep setting the @Var1 variable with 50 or more different values to get different set of results.
Instead of executing the above queries 50 odd times, the following steps could be used for once instead to achieve the same results:
1. The first step is to get the 50 or more odd values into a table using a condition that could be used further:
SELECT * INTO SETOFVALUESTABLE FROM SOMETABLE WHERE -- CONDITION
2. Next step is to declare a cursor that could accomplish our task:
DECLARE @Var1 NVARCHAR(100)
DECLARE db_cursor CURSOR FOR
SELECT COLUMNNAME FROM SETOFVALUESTABLE
OPEN db_cursor
FETCH NEXT FROM db_cursor INTO @Var1
WHILE @@FETCH_STATUS = 0
BEGIN
SELECT VALUES FROM TABLENAME WHERE VALUE = @Var1
.
.
.
...-- many other similar queries using the value of @Var1
FETCH NEXT FROM db_cursor INTO @Var1
END
CLOSE db_cursor
DEALLOCATE db_cursor
Using the above steps saved me a lot of time and made it so simple and productive instead of the 50+ times execution of queries.
There might still be better efficient ways to achieve the same with which I plan to optimize, but the above method is one quick way to get around the problem we faced.
Tuesday, June 02, 2009


Monday, September 15, 2008
HOW TO: Connect to AX 4.0 from a .NET Application using Business connector
This article demonstrates how a we can connect to Microsoft Dynamics AX 4.0 from a .NET based application.
You can find a good explanation of Microsoft Dynamics AX from here.
For this you will need to have Microsoft Dynamics AX Client installed on your machine. You must also have Dynamics AX .NET Business connector installed on your machine - to connect to AX from .NET.
Once you have the client components installed, you must configure your client to connect to an Axapta server from Control panel -> Administrative tools ->Microsoft Dynamics AX Configuration Utility.

Once configured, you can open the AX client UI from Start-> Programs-> Microsoft Dynamics AX.

Lets now see how to invoke a simple method in AX from a .NET application.
The following method should be written in AX inorder to be invoked from .NET:
1. Navigate to AX UI
2. Click on Axapta Object Tree (AOT)
3. Expand classes node.
4. Add the following class and method:

5. Test this method by executing it as a Job.
(AOT-> Jobs ->Create a simple job -> add the above code with an Info statement.)
Once the above steps are executed successfully, the following are the steps for invoking this AX method in .NET.
1. Open a new Console application using Visual Studio 2008
2. Add the following Reference to the Project:
Microsoft.Dynamics.BusinessConnectorNet
This dll is present in:
C:\Program Files\Microsoft Dynamics AX\40\Client\Bin
3. Naviate to Program.cs file and add the following namespace for reference:
using Microsoft.Dynamics.BusinessConnectorNet;
4. Add the following code in main() to invoke the AX method:
static void Main(string[] args)
{
try
{
Axapta ax = new Axapta();
ax.Logon(null, null, null, null);
string strName = " Microsoft Dynamics AX ";
AxaptaObject axObject;
axObject = ax.CreateAxaptaObject("NetConnector");
string resonseFromAxapta = (string)axObject.Call("SampleMethod", strName);
Console.WriteLine(resonseFromAxapta);
Console.ReadLine();
ax.Logoff();
}
catch (Exception ex)
{
Console.WriteLine(ex.Message);
}
}
5. Compile and Run the Application.
Thats all about it! You now should see the data coming from Axapta in .NET.
You can find a good explanation of Microsoft Dynamics AX from here.
For this you will need to have Microsoft Dynamics AX Client installed on your machine. You must also have Dynamics AX .NET Business connector installed on your machine - to connect to AX from .NET.
Once you have the client components installed, you must configure your client to connect to an Axapta server from Control panel -> Administrative tools ->Microsoft Dynamics AX Configuration Utility.

Once configured, you can open the AX client UI from Start-> Programs-> Microsoft Dynamics AX.

Lets now see how to invoke a simple method in AX from a .NET application.
The following method should be written in AX inorder to be invoked from .NET:
1. Navigate to AX UI
2. Click on Axapta Object Tree (AOT)
3. Expand classes node.
4. Add the following class and method:

5. Test this method by executing it as a Job.
(AOT-> Jobs ->Create a simple job -> add the above code with an Info statement.)
Once the above steps are executed successfully, the following are the steps for invoking this AX method in .NET.
1. Open a new Console application using Visual Studio 2008
2. Add the following Reference to the Project:
Microsoft.Dynamics.BusinessConnectorNet
This dll is present in:
C:\Program Files\Microsoft Dynamics AX\40\Client\Bin
3. Naviate to Program.cs file and add the following namespace for reference:
using Microsoft.Dynamics.BusinessConnectorNet;
4. Add the following code in main() to invoke the AX method:
static void Main(string[] args)
{
try
{
Axapta ax = new Axapta();
ax.Logon(null, null, null, null);
string strName = " Microsoft Dynamics AX ";
AxaptaObject axObject;
axObject = ax.CreateAxaptaObject("NetConnector");
string resonseFromAxapta = (string)axObject.Call("SampleMethod", strName);
Console.WriteLine(resonseFromAxapta);
Console.ReadLine();
ax.Logoff();
}
catch (Exception ex)
{
Console.WriteLine(ex.Message);
}
}
5. Compile and Run the Application.
Thats all about it! You now should see the data coming from Axapta in .NET.
Saturday, September 06, 2008
HOW TO: Create a CSV File using System.IO classes
CSV (Comma Separated Values) file is a text based file in which data are separated by comma. It can be opened by excel so you can use excel functionality. Each row of data including the title is in separate line. Each row has data separated by comma.
If its an ASP.NET application, a CSV file can be easily created by setting the
HttpContext.Current.Response.ContentType = "text/csv";
For other Windows applications or a Windows based service, the above method cannot be used. The other possible way is to use the Interop Excel object to create. However, this may require an extra dll to be added to your app. As this is an Interop dll, its not managed and maintaining this dll may become difficult in future.
The following method gives an easier way of handling this - using the classes in System.IO namespace. The below is a code extract that shows how this can be done. We have used a simple example of getting a list of employees
using System.IO;
using System.Text;
private string[] empDetailsHeader = {
"Employee ID",
"Name",
"Salary"
};
private const string separator = ",";
private void CreateCSVFile(string filePath){
try {
StringBuilder csvString = new StringBuilder();
List empList = new List();
//Writing the Header
for (int i = 0; i < empDetailsHeader.Count(); i++){
csvString.Append(empDetailsHeader[i]);
csvString.Append(separator);
}
//Get the list containing the Employee details
empList = GetEmployeeList();
csvString.AppendLine();
foreach (Employee employee in EmpDetails){
csvString.Append(employee.ID.ToString());
csvString.Append(separator);
csvString.Append(employee.Name.ToString());
csvString.Append(separator);
csvString.Append(employee.Salary.ToString());
csvString.Append(separator);
//Next Line
csvString.AppendLine();
}
//save the file
SaveFile(filePath, csvString);
}
private void SaveFile(string filePath, StringBuilder stringBuidler) {
if (File.Exists(filePath)){
File.Delete(filePath);
}else{
StreamWriter streamWriter = new StreamWriter(filePath);
streamWriter.Write(stringBuidler.ToString());
streamWriter.Close();
}
}
Now how do we take care if there is a comma in the data that we need to get into the CSV? Any comma in data is taken as a delimiter for taking the data to the next column. As a work around for this - to still maintain the same data, we can wrap the text using double quotes.
For example, suppose the Salary column in the above data has a value 40,000. Some developers use the method of replacing this comma with space. By doing this we sometimes lose the authenticity of data.
To make sure that we still maintain the correct data, we need to wrap the string with double quotes.
char doubleQuote = '"';
if(employee.Salary.ToString().Contains(",")) {
csvString.Append(doubleQuote);
csvString.Append(employee.Salary.ToString());
csvString.Append(doubleQuote);
}
This will ensure that we have correct data in the CSV File that is created.
If its an ASP.NET application, a CSV file can be easily created by setting the
HttpContext.Current.Response.ContentType = "text/csv";
For other Windows applications or a Windows based service, the above method cannot be used. The other possible way is to use the Interop Excel object to create. However, this may require an extra dll to be added to your app. As this is an Interop dll, its not managed and maintaining this dll may become difficult in future.
The following method gives an easier way of handling this - using the classes in System.IO namespace. The below is a code extract that shows how this can be done. We have used a simple example of getting a list of employees
using System.IO;
using System.Text;
private string[] empDetailsHeader = {
"Employee ID",
"Name",
"Salary"
};
private const string separator = ",";
private void CreateCSVFile(string filePath){
try {
StringBuilder csvString = new StringBuilder();
List
//Writing the Header
for (int i = 0; i < empDetailsHeader.Count
csvString.Append(empDetailsHeader[i]);
csvString.Append(separator);
}
//Get the list containing the Employee details
empList = GetEmployeeList();
csvString.AppendLine();
foreach (Employee employee in EmpDetails){
csvString.Append(employee.ID.ToString());
csvString.Append(separator);
csvString.Append(employee.Name.ToString());
csvString.Append(separator);
csvString.Append(employee.Salary.ToString());
csvString.Append(separator);
//Next Line
csvString.AppendLine();
}
//save the file
SaveFile(filePath, csvString);
}
private void SaveFile(string filePath, StringBuilder stringBuidler) {
if (File.Exists(filePath)){
File.Delete(filePath);
}else{
StreamWriter streamWriter = new StreamWriter(filePath);
streamWriter.Write(stringBuidler.ToString());
streamWriter.Close();
}
}
Now how do we take care if there is a comma in the data that we need to get into the CSV? Any comma in data is taken as a delimiter for taking the data to the next column. As a work around for this - to still maintain the same data, we can wrap the text using double quotes.
For example, suppose the Salary column in the above data has a value 40,000. Some developers use the method of replacing this comma with space. By doing this we sometimes lose the authenticity of data.
To make sure that we still maintain the correct data, we need to wrap the string with double quotes.
char doubleQuote = '"';
if(employee.Salary.ToString().Contains(",")) {
csvString.Append(doubleQuote);
csvString.Append(employee.Salary.ToString());
csvString.Append(doubleQuote);
}
This will ensure that we have correct data in the CSV File that is created.
Wednesday, September 13, 2006
ASP.NET 2.0 - A Preview of Web LINQ - BLINQ - Part II
Part I of this article discussed on the basics of LINQ, and what DLINQ and XLINQ are.
The following is a step by step procedure in using BLINQ.
1. Download the MSI from:
http://www.asp.net/sandbox/app_blinq.aspx?tabid=622.
For using BLINQ, May 2006 CTP of LINQ must be installed in your machine.
Refer Part I of the article for this.
3. Install the MSI in your system. By default, BLINQ gets installed in C:\Program Files\Microsoft ASP.NET\BLINQ.
4. Open Visual Studio 2005. On the File Menu, point to New and then click Web Site.
5. Under Visual Studio installed templates, select ASP.NET Web Site.
6. In the Location drop down list, select File System and give the path as C:\BLINQDemo and then click OK. This creates a new Web Applcation.
7. Now click Start, and then click Run. Type cmd in the Open box and then click OK.
8. In the command prompt type cd "\Program Files\Microsoft ASP.NET\Blinq" .
9. Now run the BLinq tool on the created Web Site by typing the following command, replacing Servername,UserName and Password accordingly. Also copy the same
to a single line before running the command. I have split it here for posting
purposes:
Blinq /t:c:\BLINQDemo /database:Northwind /vDir:BLINQDemo
/server:ServerName /user:UserName /password:Password
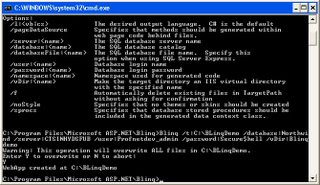
10. You will be prompted if your web site can be over written. Type Y and then press enter.
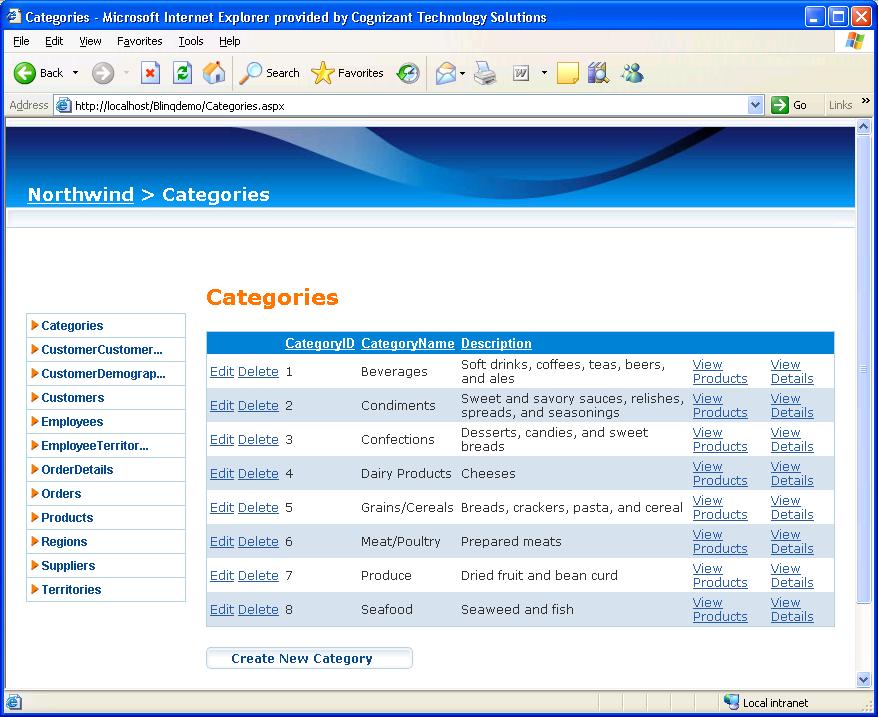
11. After successful creation, you will get a message WebApp created at C:\Blinqdemo.And the web site opens up at http://localhost/blinqdemo/categories.aspx, as shown below:
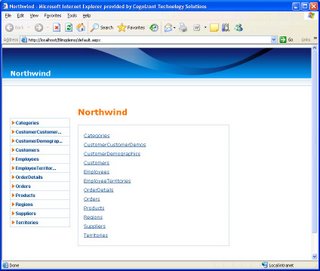
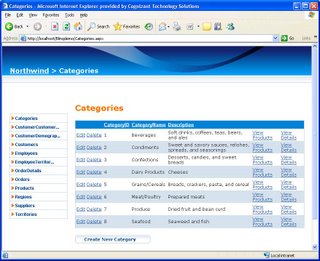
You will also be able to perform all Insert,Update,Delete, View (CRUD) options on the entire Database. The image below shows the Update,Delete and View options in Categories.
BLINQ is definitely an exciting tool for every developer. Let us wait for the next release of this tool, integrated with Visual Studio.
The following is a step by step procedure in using BLINQ.
1. Download the MSI from:
http://www.asp.net/sandbox/app_blinq.aspx?tabid=622.
For using BLINQ, May 2006 CTP of LINQ must be installed in your machine.
Refer Part I of the article for this.
3. Install the MSI in your system. By default, BLINQ gets installed in C:\Program Files\Microsoft ASP.NET\BLINQ.
4. Open Visual Studio 2005. On the File Menu, point to New and then click Web Site.
5. Under Visual Studio installed templates, select ASP.NET Web Site.
6. In the Location drop down list, select File System and give the path as C:\BLINQDemo and then click OK. This creates a new Web Applcation.
7. Now click Start, and then click Run. Type cmd in the Open box and then click OK.
8. In the command prompt type cd "\Program Files\Microsoft ASP.NET\Blinq" .
9. Now run the BLinq tool on the created Web Site by typing the following command, replacing Servername,UserName and Password accordingly. Also copy the same
to a single line before running the command. I have split it here for posting
purposes:
Blinq /t:c:\BLINQDemo /database:Northwind /vDir:BLINQDemo
/server:ServerName /user:UserName /password:Password
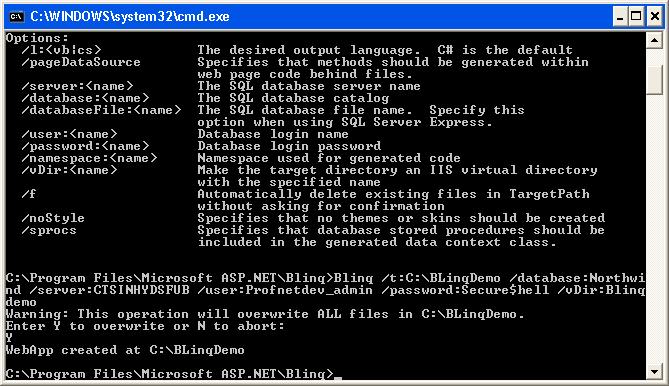
10. You will be prompted if your web site can be over written. Type Y and then press enter.
11. After successful creation, you will get a message WebApp created at C:\Blinqdemo.And the web site opens up at http://localhost/blinqdemo/categories.aspx, as shown below:

You will also be able to perform all Insert,Update,Delete, View (CRUD) options on the entire Database. The image below shows the Update,Delete and View options in Categories.
BLINQ is definitely an exciting tool for every developer. Let us wait for the next release of this tool, integrated with Visual Studio.
ASP.NET 2.0 - A Preview of Web LINQ - BLINQ - Part I
LINQ has been the recent buzz word as its a part of the C# 3.0 family. In this article let us take a quick look at what LINQ, DLINQ and XLINQ are all about and what BINQ - Web LINQ offers us.
LINQ - Language Integrated Query is a technology that gives us the flexibility of performing query language operations in .NET. Formerly introduced as ObjectSpaces, LINQ is now available as a Community Technology Preview in http://msdn.microsoft.com/data/ref/linq.
The first step is to download the May 2006 CTP from the above link and install the same in your system. The CTP requires that Visual Studio 2005 is installed in your system. On installing the same, you will find a lot of samples and documents that are given as a part of the CTP.
LINQ provies a lot of features to improve the developer productivity by minimizing a lot of data access code.Following is a sample of a query operation over an array. Such a typer of operation is not possible now in C# 2.0 and you need to loop through all elements in the array to find out the words with length 5.
using System;
using System.Query;
using System.Collections.Generic;
class app {
static void Main() {
string[] names = { "Burke", "Connor", "Frank",
"Everett", "Albert", "George",
"Harris", "David" };
IEnumerable expr = from s in names
where s.Length == 5
orderby s
select s.ToUpper();
foreach (string item in expr)
Console.WriteLine(item);
}
}
DLINQ is LINQ operated on relational data, such as data from SQL Server. The following is a sample on how
you can query the Products information in Northwind database. The metadata information of the tables
present in the Northwind database is generated using a tool called sqlmetal by pointing a particular database
to it. In the below snippet, NorthwindDataContext class contains all metadata about the entire Northwind
database.
NorthwindDataContext db = new NorthwindDataContext();
DataList1.DataSource = from p in db.Products
where p.UnitPrice > 20
orderby p.ProductName
select p;
DataList1.DataBind();
XLINQ is LINQ operating on XML data. Consider the following XML block:
<contacts>
<contact>
<name>Great Lakes Food</name>
<phone>(503) 555-7123</phone>
</contact>
…
</contacts>
Using today's C# 2.0, we need loop through each of the customer records in the collection to build an XML as
above. XLINQ significantly improves this process. A sample code using XLINQ to build a simple XML is given below:
XElement contacts = new XElement("contacts",
from c in customers
where c.Country == "USA"
select new XElement("contact",
new XElement("name", c.CompanyName),
new XElement("phone", c.Phone)
)
);
BLINQ is currently a tool, available for download at :
http://www.asp.net/sandbox/app_blinq.aspx?tabid=62
In the next article we will discuss on how to start using BLINQ.
LINQ - Language Integrated Query is a technology that gives us the flexibility of performing query language operations in .NET. Formerly introduced as ObjectSpaces, LINQ is now available as a Community Technology Preview in http://msdn.microsoft.com/data/ref/linq.
The first step is to download the May 2006 CTP from the above link and install the same in your system. The CTP requires that Visual Studio 2005 is installed in your system. On installing the same, you will find a lot of samples and documents that are given as a part of the CTP.
LINQ provies a lot of features to improve the developer productivity by minimizing a lot of data access code.Following is a sample of a query operation over an array. Such a typer of operation is not possible now in C# 2.0 and you need to loop through all elements in the array to find out the words with length 5.
using System;
using System.Query;
using System.Collections.Generic;
class app {
static void Main() {
string[] names = { "Burke", "Connor", "Frank",
"Everett", "Albert", "George",
"Harris", "David" };
IEnumerable
where s.Length == 5
orderby s
select s.ToUpper();
foreach (string item in expr)
Console.WriteLine(item);
}
}
DLINQ is LINQ operated on relational data, such as data from SQL Server. The following is a sample on how
you can query the Products information in Northwind database. The metadata information of the tables
present in the Northwind database is generated using a tool called sqlmetal by pointing a particular database
to it. In the below snippet, NorthwindDataContext class contains all metadata about the entire Northwind
database.
NorthwindDataContext db = new NorthwindDataContext();
DataList1.DataSource = from p in db.Products
where p.UnitPrice > 20
orderby p.ProductName
select p;
DataList1.DataBind();
XLINQ is LINQ operating on XML data. Consider the following XML block:
<contacts>
<contact>
<name>Great Lakes Food</name>
<phone>(503) 555-7123</phone>
</contact>
…
</contacts>
Using today's C# 2.0, we need loop through each of the customer records in the collection to build an XML as
above. XLINQ significantly improves this process. A sample code using XLINQ to build a simple XML is given below:
XElement contacts = new XElement("contacts",
from c in customers
where c.Country == "USA"
select new XElement("contact",
new XElement("name", c.CompanyName),
new XElement("phone", c.Phone)
)
);
BLINQ is currently a tool, available for download at :
http://www.asp.net/sandbox/app_blinq.aspx?tabid=62
In the next article we will discuss on how to start using BLINQ.
Tuesday, September 05, 2006
ASP.NET - Maintaining Versions in Web Setup projects
During deployment of projects, many times we come across the situation to reinstall the same application with some changes to the code. Usually when we have an MSI build, the build often prompts us to uninstall the older version and reinstall the latest version.
In this article we will discuss on how to install different versions of the same application and not force overwriting the application. The steps for creating an MSI installer for ASP.NET 2.0 projects is explained in this article.
Everytime a new version of a product is installed the reason why the MSI prompts to uninstall the existing application and install a new version is due to the same ProductCode Guid that is present in both the older version and the newer version of the product.
To install different versions of the same application, follow these steps:
1. Add the setup project to your application and add the necessary primary outputs as described in this article. Name this project as MySetupProject.
2. Select MySetupProject in Solution Explorer and then press F4 key. This will open the Properties window.
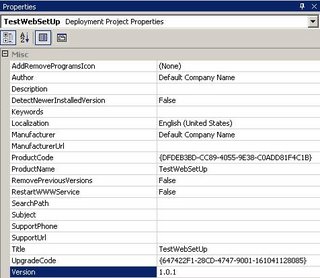
3. Note the Version property in the left column. Everytime a newer version of the application needs to be installed, increment the version number, say from 1.0.0 to 1.0.1 and so on.When you change this number and press enter, you will get the following prompt:

4. Click Yes on the prompt. You will notice that ProductCode property value (a GUID) is changed once you change the version number.
5. Now notice the RemovePreviousVersions property. This property is for specifying whether to over write the different versions or to have the different versions separately.
Making the RemovePreviousVersions to true means that every new version of your product will be over written.
Making this property to False gives you the flexibility to have both your older version and the newer version separately installed.
Thus by incrementing the Version and making RemovePreviousVersions to False you can have different versions of the same product running on your machine.
Now with this setup, we must also ensure that only a particular version that we need is used after deployment. The next article discusses on this topic of using a preferred version of your application after deployment.
In this article we will discuss on how to install different versions of the same application and not force overwriting the application. The steps for creating an MSI installer for ASP.NET 2.0 projects is explained in this article.
Everytime a new version of a product is installed the reason why the MSI prompts to uninstall the existing application and install a new version is due to the same ProductCode Guid that is present in both the older version and the newer version of the product.
To install different versions of the same application, follow these steps:
1. Add the setup project to your application and add the necessary primary outputs as described in this article. Name this project as MySetupProject.
2. Select MySetupProject in Solution Explorer and then press F4 key. This will open the Properties window.
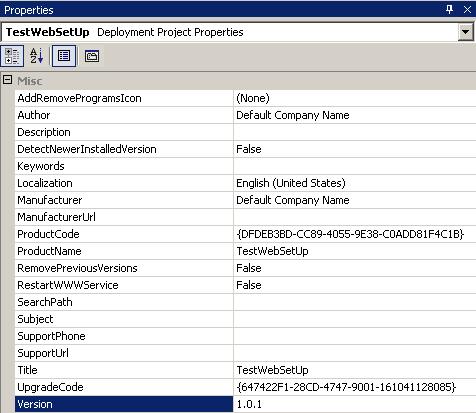
3. Note the Version property in the left column. Everytime a newer version of the application needs to be installed, increment the version number, say from 1.0.0 to 1.0.1 and so on.When you change this number and press enter, you will get the following prompt:

4. Click Yes on the prompt. You will notice that ProductCode property value (a GUID) is changed once you change the version number.
5. Now notice the RemovePreviousVersions property. This property is for specifying whether to over write the different versions or to have the different versions separately.
Making the RemovePreviousVersions to true means that every new version of your product will be over written.
Making this property to False gives you the flexibility to have both your older version and the newer version separately installed.
Thus by incrementing the Version and making RemovePreviousVersions to False you can have different versions of the same product running on your machine.
Now with this setup, we must also ensure that only a particular version that we need is used after deployment. The next article discusses on this topic of using a preferred version of your application after deployment.
Wednesday, June 21, 2006
ASP.NET 2.0 Deployment : Installer for updating Web.Config settings during Setup - Part II
In Part I of the article we saw how Visual Studio 2005 Web Deployment Projects help in deployment of ASP.NET 2.0 applications. Let us now look at how we can make use of this add-on in building an MSI that also sets the configuration settings.
The first step is to add an installer class in your web project. This installer class will be used in setting the configuration settings in web.config. The following steps will discuss on adding the installer class:
1. Right click on your web project, and then click Add New Item.
2. Under Templates, click Class, and then give the name of the class as InstallerClass.cs.
3. This will get added in the App_Code folder in your web application.
4. Right click on the Web Project, and then click Add Reference. Add the following references to the Web project:
System.Configuration.Install
System.Configuration
System.Windows.Forms
5. Open InstallerClass.cs, and then replace it with the following code:
using System;
using System.Data;
using System.Configuration;
using System.Web;
using System.Web.Security;
using System.Web.UI;
using System.Web.UI.WebControls;
using System.Web.UI.WebControls.WebParts;
using System.Web.UI.HtmlControls;
using System.Configuration.Install;
using System.ComponentModel;
using System.Collections;
using System.Windows.Forms;
using System.Xml;
///
/// Summary description for InstallerClass
///
[RunInstaller(true)]
public class InstallerClass : System.Configuration.Install.Installer
{
private System.ComponentModel.Container components = null;
public InstallerClass()
{
components = new System.ComponentModel.Container();
}
protected override void OnBeforeInstall(IDictionary stateSaver)
{
string server = this.Context.Parameters["DATASOURCE"];
string userId = this.Context.Parameters["USERID"];
string password = this.Context.Parameters["PASSWORD"];
string newConnectionString = "User Id=" + userId + ";Password= " + password + ";Data Source =" + server + ";";
string xmlConfigFile = "";
xmlConfigFile = Context.Parameters["INSTALLDIR"] + "web.config";
UpdateConfigFile(xmlConfigFile, newConnectionString, "connectionString");
}
public void UpdateConfigFile(string filepath, string newValue, string keyName)
{
XmlReaderSettings xmlReaderSettings = null;
XmlDocument doc = null;
XmlReader xmlReader = null;
XmlWriterSettings xmlWriterSettings = null;
XmlWriter writer = null;
try
{
xmlReaderSettings = new XmlReaderSettings();
doc = new XmlDocument();
xmlReader = XmlReader.Create(filepath, xmlReaderSettings);
doc.Load(xmlReader);
xmlReaderSettings.CloseInput = true;
foreach (XmlNode node in doc.DocumentElement.ChildNodes)
{
if (node.Name == "connectionStrings")
foreach (XmlNode childNode in node.ChildNodes)
{
if (childNode.Name == "add" && childNode.Attributes["connectionString"] != null && childNode.Attributes["name"].Value == keyName)
{
string connStr = childNode.Attributes["connectionString"].Value.ToString();
string newConnStr = newValue;
childNode.Attributes["connectionString"].Value = newConnStr;
}
}
}
xmlReader.Close();
xmlWriterSettings = new XmlWriterSettings();
xmlWriterSettings.Indent = true;
xmlWriterSettings.CloseOutput = true;
writer = XmlWriter.Create(filepath, xmlWriterSettings);
doc.Save(writer);
}
catch (Exception)
{
//Handle exeptions
}
finally
{
writer.Close();
}
}
}
6. Save the file and build your web project.
In Part I of the article we discussed on how to add a Web deployment. Make sure the Web Deployment Project is added to the Web project and the settings are done as detailed in Part I of this article. Rebuild this Web Deployment project also.
The next step is to build an MSI. The following steps explain the same:
1. Right click on the solution node in Solution Explorer, point to Add, and then click New Project.
2. Select Setup and Deployment under Other Project Types from the Project Types box.
3. Select Web Setup Project under Templates, and then give a name MyNewWebSiteSetup.
4. Right click MyNewWebSiteSetup on Solution Explorer, point to Add, and then click Project Output.
5. From the Project dropdown, choose(i.e. the Web Deployment project that you have added and compiled). You will find that Precompiled Web Outputs from (Active) is added to your Setup project.
6. Right click MyNewWebSiteSetup on Solution Explorer, point to Add, and then click Assembly.
7. From the Browse tab, browse to the folder where your Web Deployment Project is present. Under the MyNewWebSite_deploy-> Debug -> Bin
(refer Point 5 in Part I of the article).
8. Right click MyNewWebSiteSetup on Solution Explorer, point to View, and then click User Interface.
9. Under the Install node, right click on Start and then click Add Dialog.
10. From the Add Dialog pop up choose Textboxes (A) and then click OK.
11. Right click Textboxes (A) node and then click Properties Window.
12. In the Properties window, set the following properties:
BannerText - Configuration Settings
BodyText- Please provide values for Configuration Settings
Edit1Label-DataSource:
Edit1Property- DATASOURCE
Edit2Label-UserId:
Edit2Property- USERID
Edit3Label-Password:
Edit3Property- PASSWORD
Edit4Visible-False
13. After setting the above properties, close the Properties window.
14. Right click MyNewWebSiteSetup on Solution Explorer, point to View, and then click Custom Actions.
15. On the left pane, right click Install node under Custom Actions, and then click Add Custom Action.
16. In the Look in dropdown list in Select Item in Project dialog, select Web Application Folder.
17. Click the Add File button and then choose the single assembly dll that is present under theMyNewWebSite_deploy -> Debug -> Bin -> MyNewWebSiteAssembly.dll.
Note : If you have not set any path when adding, it would be present in C:\Documents and Settings\ My Documents\Visual Studio 2005\Projects\ GridViewWeb\ MyNewWebSite_deploy\ Debug\bin\ MyNewWebSiteAssembly.dll.
18. Right click MyNewWebSiteAssembly.dll on the left pane, and then click Properties Window.
19. In the Properties Window, set the CustomActionData property to the following:
/datasource=[DATASOURCE] / userid=[USERID] /password=[PASSWORD] /INSTALLDIR="[TARGETDIR]\"
These are precisely the properties we use in the InstallerClass.
20. Right click MyNewWebSiteSetup on Solution Explorer, and then click Build.
21. You can test the installation of MSI using the Install option when you right click MyNewWebSiteSetup on Solution Explorer.
You will find that you can set the connection string properties at runtime during installation of your Web Application.
22. Set your project in Release mode, and then take a build again to take the final installable.
While picking up the single assembly dll was straight forward in ASP.NET 1.1, in ASP.NET 2.0, this has been made possible with the Visual Studio Web Deployment Project Add on. This makes adding the Custom Actions possible.
The first step is to add an installer class in your web project. This installer class will be used in setting the configuration settings in web.config. The following steps will discuss on adding the installer class:
1. Right click on your web project, and then click Add New Item.
2. Under Templates, click Class, and then give the name of the class as InstallerClass.cs.
3. This will get added in the App_Code folder in your web application.
4. Right click on the Web Project, and then click Add Reference. Add the following references to the Web project:
System.Configuration.Install
System.Configuration
System.Windows.Forms
5. Open InstallerClass.cs, and then replace it with the following code:
using System;
using System.Data;
using System.Configuration;
using System.Web;
using System.Web.Security;
using System.Web.UI;
using System.Web.UI.WebControls;
using System.Web.UI.WebControls.WebParts;
using System.Web.UI.HtmlControls;
using System.Configuration.Install;
using System.ComponentModel;
using System.Collections;
using System.Windows.Forms;
using System.Xml;
///
/// Summary description for InstallerClass
///
[RunInstaller(true)]
public class InstallerClass : System.Configuration.Install.Installer
{
private System.ComponentModel.Container components = null;
public InstallerClass()
{
components = new System.ComponentModel.Container();
}
protected override void OnBeforeInstall(IDictionary stateSaver)
{
string server = this.Context.Parameters["DATASOURCE"];
string userId = this.Context.Parameters["USERID"];
string password = this.Context.Parameters["PASSWORD"];
string newConnectionString = "User Id=" + userId + ";Password= " + password + ";Data Source =" + server + ";";
string xmlConfigFile = "";
xmlConfigFile = Context.Parameters["INSTALLDIR"] + "web.config";
UpdateConfigFile(xmlConfigFile, newConnectionString, "connectionString");
}
public void UpdateConfigFile(string filepath, string newValue, string keyName)
{
XmlReaderSettings xmlReaderSettings = null;
XmlDocument doc = null;
XmlReader xmlReader = null;
XmlWriterSettings xmlWriterSettings = null;
XmlWriter writer = null;
try
{
xmlReaderSettings = new XmlReaderSettings();
doc = new XmlDocument();
xmlReader = XmlReader.Create(filepath, xmlReaderSettings);
doc.Load(xmlReader);
xmlReaderSettings.CloseInput = true;
foreach (XmlNode node in doc.DocumentElement.ChildNodes)
{
if (node.Name == "connectionStrings")
foreach (XmlNode childNode in node.ChildNodes)
{
if (childNode.Name == "add" && childNode.Attributes["connectionString"] != null && childNode.Attributes["name"].Value == keyName)
{
string connStr = childNode.Attributes["connectionString"].Value.ToString();
string newConnStr = newValue;
childNode.Attributes["connectionString"].Value = newConnStr;
}
}
}
xmlReader.Close();
xmlWriterSettings = new XmlWriterSettings();
xmlWriterSettings.Indent = true;
xmlWriterSettings.CloseOutput = true;
writer = XmlWriter.Create(filepath, xmlWriterSettings);
doc.Save(writer);
}
catch (Exception)
{
//Handle exeptions
}
finally
{
writer.Close();
}
}
}
6. Save the file and build your web project.
In Part I of the article we discussed on how to add a Web deployment. Make sure the Web Deployment Project is added to the Web project and the settings are done as detailed in Part I of this article. Rebuild this Web Deployment project also.
The next step is to build an MSI. The following steps explain the same:
1. Right click on the solution node in Solution Explorer, point to Add, and then click New Project.
2. Select Setup and Deployment under Other Project Types from the Project Types box.
3. Select Web Setup Project under Templates, and then give a name MyNewWebSiteSetup.
4. Right click MyNewWebSiteSetup on Solution Explorer, point to Add, and then click Project Output.
5. From the Project dropdown, choose
6. Right click MyNewWebSiteSetup on Solution Explorer, point to Add, and then click Assembly.
7. From the Browse tab, browse to the folder where your Web Deployment Project is present. Under the MyNewWebSite_deploy
(refer Point 5 in Part I of the article).
8. Right click MyNewWebSiteSetup on Solution Explorer, point to View, and then click User Interface.
9. Under the Install node, right click on Start and then click Add Dialog.
10. From the Add Dialog pop up choose Textboxes (A) and then click OK.
11. Right click Textboxes (A) node and then click Properties Window.
12. In the Properties window, set the following properties:
BannerText - Configuration Settings
BodyText- Please provide values for Configuration Settings
Edit1Label-DataSource:
Edit1Property- DATASOURCE
Edit2Label-UserId:
Edit2Property- USERID
Edit3Label-Password:
Edit3Property- PASSWORD
Edit4Visible-False
13. After setting the above properties, close the Properties window.
14. Right click MyNewWebSiteSetup on Solution Explorer, point to View, and then click Custom Actions.
15. On the left pane, right click Install node under Custom Actions, and then click Add Custom Action.
16. In the Look in dropdown list in Select Item in Project dialog, select Web Application Folder.
17. Click the Add File button and then choose the single assembly dll that is present under the
Note : If you have not set any path when adding, it would be present in C:\Documents and Settings\ My Documents\Visual Studio 2005\Projects\ GridViewWeb\ MyNewWebSite_deploy\ Debug\bin\ MyNewWebSiteAssembly.dll.
18. Right click MyNewWebSiteAssembly.dll on the left pane, and then click Properties Window.
19. In the Properties Window, set the CustomActionData property to the following:
/datasource=[DATASOURCE] / userid=[USERID] /password=[PASSWORD] /INSTALLDIR="[TARGETDIR]\"
These are precisely the properties we use in the InstallerClass.
20. Right click MyNewWebSiteSetup on Solution Explorer, and then click Build.
21. You can test the installation of MSI using the Install option when you right click MyNewWebSiteSetup on Solution Explorer.
You will find that you can set the connection string properties at runtime during installation of your Web Application.
22. Set your project in Release mode, and then take a build again to take the final installable.
While picking up the single assembly dll was straight forward in ASP.NET 1.1, in ASP.NET 2.0, this has been made possible with the Visual Studio Web Deployment Project Add on. This makes adding the Custom Actions possible.
Wednesday, June 07, 2006
ASP.NET 2.0 - Custom Paging and Custom Sorting for GridViews
Paging and sorting GridViews are the most sought after functionalities in most of the Web applications.When it comes to performance, for datacentric applications its very important to implement the custom paging/sorting mechanism instead of the
default paging/sorting for gridviews. This is because the page becomes heavily loaded when thousands of records are fetched at a strech from the
database.
To overcome this, we must implement a "Custom paging" mechanism which brings record only "on-demand". This article discusses how this can be
implemented in ASP.NET 2.0 with zero lines of code in presentation layer.
1. The first step is to write a stored proc, GetSortedItems that accepts these parameters and returns a resultset.
a. SortExpression
b. StartRow
c. EndRow
For Example, if the parameter values are ("ItemId desc", 5,10), which means the rows 5 to 10 have to be retrieved, with ItemId sorted in descending
order.
2. Another stored proc must be written, say GetItemsCount that returns the count of records that is returned from the resultset.
3. Next step is to call the stored proc in the Data Access layer, and return a Collection object.
public QueryList GetSortedQueries(string sort, int startRowIndex, int maximumRows, int x, string y)
{
DataSet dsQueryList = null;
OdpHelper adoHelper = new OdpHelper();
QueryEntity queryEntity = null;
QueryList queryList = null;
string connectionString = ConfigurationManager.ConnectionStrings["connectionString"].ConnectionString;
IDataParameter[] param = null;
param = adoHelper.GetDataParameters(4);
param[0] = adoHelper.GetRefCurParameter("p_cursor");
param[0].Direction = ParameterDirection.Output;
param[1] = adoHelper.GetParameter("P_SortExp",
DbType.String,
1000,
ParameterDirection.Input
);
param[1].Value = sort;
param[2] = adoHelper.GetParameter("BV_STARTROW",
DbType.Int32,
4,
ParameterDirection.Input
);
param[2].Value = startRowIndex;
param[3] = adoHelper.GetParameter("BV_ENDROW",DbType.Int32,4,ParameterDirection.Input);
int lastRow = startRowIndex + maximumRows;
param[3].Value = lastRow;
dsQueryList = adoHelper.ExecuteDataset(connectionString,"TestCustomPagingWithSorting",param);
queryList = new QueryList();
//loops through the dataset rows to load displaycontrols retrieved into the list
if (dsQueryList.Tables.Count > 0)
{
if (dsQueryList.Tables[0].Rows.Count > 0)
{
foreach (DataRow drQueryEntity in dsQueryList.Tables[0].Rows)
{
queryEntity = new QueryEntity();
if (drQueryEntity["queryid"] != DBNull.Value)
{
queryEntity.QueryId = Convert.ToInt32(drQueryEntity["queryid"].ToString());
}
if (drQueryEntity["querytypeid"] != DBNull.Value)
{
queryEntity.QueryTypeId = Convert.ToInt32(drQueryEntity["querytypeid"].ToString());
}
queryList.Add(queryEntity);
}
}
}
return queryList;
}
4. In the Presentation layer, all we have to do is to add an ObjectDataSource control and set the following properties:
- SelectMethod property to the GetSortedQueryList method - either from Data Access Layer or Business Facade
- TypeName property to the Data Access Layer or Business Facade class that has the specific method.
- SortParameterName property to the parameter name in which the Sort expression is passed.
- SelectCountMethod is the method in the Data Access Layer or Business Facade class that returns the count of records.
- The <SelectParameters> are the individual parameters that are present passed to the SelectMethod and SelectCountMethod.
- If the GridView has to be bound on triggering of an event, just do not specify the DataSourceID="ObjectDataSource1" in GridView, and add these
two lines of code in the event.
GridView1.DataSourceID = "ObjectDataSource1";
GridView1.DataBind();
Ex:
<asp:ObjectDataSource ID="ObjectDataSource1" runat="server" SelectMethod="GetSortedQueryList"
SortParameterName="sort" TypeName="CustomPagingService.CustomPagingService" SelectCountMethod="GetQueryListCount"
EnablePaging="True" >
<SelectParameters>
<asp:Parameter DefaultValue="Asc" Name="sort" Type="String" />
<asp:Parameter DefaultValue="1" Name="startRowIndex" Type="Int32" />
<asp:Parameter DefaultValue="10" Name="maximumRows" Type="Int32" />
<asp:Parameter DefaultValue="10" Name="x" Type="Int32" />
<asp:Parameter DefaultValue="" Name="y" Type="String" />
</SelectParameters>
</asp:ObjectDataSource>
<asp:GridView ID="GridView2" DataKeyNames="QueryId" runat="server" AllowPaging="True"
AllowSorting="true" AutoGenerateColumns="false"
PageSize="5">
<Columns>
<asp:BoundField DataField="QueryId" ReadOnly="true" HeaderText="QueryId" SortExpression="QueryId" />
<asp:BoundField DataField="QueryTypeId" ReadOnly="true" HeaderText="QueryTypeId"
SortExpression="QueryTypeId" />
</Columns>
<PagerSettings FirstPageText="First" LastPageText="Last" Mode="NumericFirstLast" />
</asp:GridView>
Thats it. Just compile and run your page. You will find that by just setting properties with no line of code in the presentation layer, Custom paging and sorting functionalites are achieved.
Monday, May 15, 2006
ASP.NET 2.0 Deployment : Installer for updating Web.Config settings during Setup - Part I
Many of us are aware of ASP.NET deployment using Web Setup Projects. There are many articles that describe this.
Web.config forms a crucial part in any web application. When a Web Application is deployed in a client's place it becomes a brilliant idea to provide a UI for updating the Web.config settings.
In ASP.NET 1.1 this was quite straight forward, where you can directly use the assembly of the Web project and create Custom Actions in Web Setup. However, in ASP.NET 2.0 this is quite tricky. This is because of the compilation model of ASP.NET 2.0. By default the compilation model does not give any single dll that can be added to the Custom Actions of Web Setup.
For this reason, Microsoft has released a new Add-On called the Visual Studio 2005 Web Deployment Projects. Click here for more details and a free download.
Let us check how this Add-on can be help in our deployment, in a step by step fashion.
1. The First step is to install the Add-on from the link above.
2. Once you install the Add-on, right click on your Web Project. You will notice a new menu called Add Web Deployment Project.
Web.config forms a crucial part in any web application. When a Web Application is deployed in a client's place it becomes a brilliant idea to provide a UI for updating the Web.config settings.
In ASP.NET 1.1 this was quite straight forward, where you can directly use the assembly of the Web project and create Custom Actions in Web Setup. However, in ASP.NET 2.0 this is quite tricky. This is because of the compilation model of ASP.NET 2.0. By default the compilation model does not give any single dll that can be added to the Custom Actions of Web Setup.
For this reason, Microsoft has released a new Add-On called the Visual Studio 2005 Web Deployment Projects. Click here for more details and a free download.
Let us check how this Add-on can be help in our deployment, in a step by step fashion.
1. The First step is to install the Add-on from the link above.
2. Once you install the Add-on, right click on your Web Project. You will notice a new menu called Add Web Deployment Project.
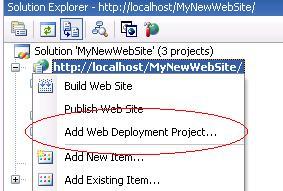
3. On clicking this you will be prompted to give a name and location for this project. Give a proper name and location and click OK.The new Web Deployment gets added to your Solution.
4. Right click the new project and then click Property Pages.
5. In the Configuration Properties treeview, click Output Assemblies.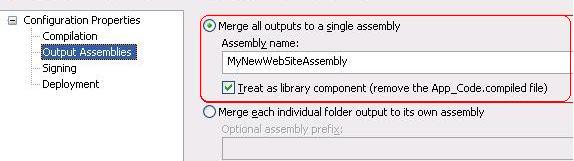
6. Select the Merge all outputs to a single assembly option, and give an assembly name, say MyAssembly.
7. Also check the Treat as library component checkbox and then click OK.
8. Build the Web Deployment project.
9. Now browse to the location of the Web Deployment project you added from Windows Explorer.
10. You will find that your asp.net pages along with Web.config are added to this folder. Also, there is a Debug\bin folder that contains the single assembly dll for your Web Application.
This is similar to the ASP.NET 1.1 compilation model. This makes the deployment of our ASP.NET 2.0 easy.
In Part II of this article, let us see how this can be integrated to update Web.Config during deployment.
Tuesday, April 25, 2006
ASP.NET : Binding XML Data to TreeView with Checked state of Checkboxes
Often we come across data that is hierarchial in nature.
Let us take a real world example of a profile page of a person that takes the interests of a person. The Interest categories are categorized in a hierarchial structure, with Categories such as Books, Entertainment, Sports, etc. There will be sub categories, for example, for Books category there might be sub categories as Religion, Literature, etc. and Region might have sub sub categories such as Christianity, Hinduism, etc.
The best way such type of Hierarchial data can be shown is through a Treeview control. To bind the entire set of categories, sub categories, sub sub categories, the best way is to bind the TreeView with XML.
In ASP.NET 2.0 we have an XmlDataSource control that serves exactly this purpose. The XMLDataSource can take up any static XML file that contains XML data.
Ex:
<asp:XmlDataSource ID="CategoriesXmlDataSource" runat="server" DataFile="MyXml.xml"></asp:XmlDataSource>
The XmlDataSource also has a XPath property that is used to filter data in the xml.In case the data to be bound comes from database, we can use the Data property of XmlDataSource control to directly bind the xml string from database to the treeview. From the example we have taken on the Categories and Sub categories, we intend to show check boxes on the treeview, and also want the check boxes to be in checked state according to how the profile has been updated for the person. Let us now check on how we can achieve this.
The first step is to write a proper query that gives an xml document as output. This Xml document must basically contain the entire hierarchial structure that must be displayed as a treeview.If SQL Server is your database, you can easily achieve this by using joins and using the "for xml auto" clause in your query.
Now if you wish to bind the checked state of check boxes as well, using the data from database, you must also bring this checked state as another attribute of every node.
Ex: The xml from database must be something like:
<Categories>
<Category ID="1" Name="Books" checked="false">
<SubCategory Id="2" Name="Religon" checked="false">
<SubSubCategory Id="Hinduism" checked="true" />
<SubSubCategory Id="Christianity" checked="false" />
<SubSubCategory Id="Islam" checked="true" />
</SubCategory>
</Category>
</Categories>
The next step is to make this xml from database to be the datasource for XmlDatasource control. To do this, add this declaration in your aspx page:
<asp:XmlDataSource ID="XmlDataSource1" runat="server" XPath="/Categories/*"></asp:XmlDataSource>
The XPath expression filtes out the top root node and displays the rest of the nodes.
Now in the code behind page add this code in Page_load event:
XmlDataSource1.Data = GetXmlData();
The GetXmlData method retuns the entire xml structure as shown above from database.
The final step is to bind the Treeview control with this XmlDataSource. This is done using the <DataBindings> property of the ASP.NET Treeview.
To the <DataBindings> of the Treeview we add the TreeNodeBinding, for each of the different levels in the TreeView.
For this, add the following declaration in your aspx page:
<asp:TreeView runat="server" ID="tvwCategories" ExpandDepth=1 OnTreeNodeDataBound="tvwCategories_TreeNodeDataBound" ShowCheckBoxes="All" >
<DataBindings>
<asp:TreeNodeBinding DataMember="Country" SelectAction=None PopulateOnDemand=true TargetField="checked" ValueField="ID" extField="Name"></asp:TreeNodeBinding>
<asp:TreeNodeBinding DataMember="Geography" PopulateOnDemand=true SelectAction=None TargetField="checked" ValueField="ID" TextField="Name"></asp:TreeNodeBinding>
<asp:TreeNodeBinding DataMember="Region" TargetField="checked" SelectAction=None PopulateOnDemand=true ValueField="ID" TextField="Name"></asp:TreeNodeBinding>
<asp:TreeNodeBinding DataMember="State" TargetField="checked" SelectAction=None PopulateOnDemand=true ValueField="ID" TextField="Name"></asp:TreeNodeBinding> </DataBindings>
</asp:TreeView>
The DataMember property in TreeNodeBinding is used to specify the different XML elements that will be bound to the TreeView.
The ValueField and TextField properties correspond to the Xml attributes that will assign the Text and Value fields to each node in the TreeView.
The TargetField is here used to set the Checked state of the nodes from the corresponding Xml attribute (i.e. checked). (The TargetField in actual usage is for assigning the "target" html attribute, so that any link from the TreeView will open in the target window accordingly.)
The SelectAction=None specifies that the nodes in the TreeView do not have links or any other click action.
Note the method that is called in OnTreeNodeDataBound event. This method will basically set the checked state of the checkboxes.
The following is the code for the event that has to be added in the codebehind page:
protected void tvwCategories_TreeNodeDataBound(object sender, TreeNodeEventArgs e)
{
if (e.Node.Target == Convert.ToString("true"))
{
e.Node.Checked = true;
}
else
{
e.Node.Checked = false;
}
}
The page is now ready to be compiled and browsed. Of course, there are several ways to set the checked state of checkboxes in treeviews. However, using the above method we avoid the unnecessary for/foreach loops that may have to be used for doing the same.
Thanks.
Let us take a real world example of a profile page of a person that takes the interests of a person. The Interest categories are categorized in a hierarchial structure, with Categories such as Books, Entertainment, Sports, etc. There will be sub categories, for example, for Books category there might be sub categories as Religion, Literature, etc. and Region might have sub sub categories such as Christianity, Hinduism, etc.
The best way such type of Hierarchial data can be shown is through a Treeview control. To bind the entire set of categories, sub categories, sub sub categories, the best way is to bind the TreeView with XML.
In ASP.NET 2.0 we have an XmlDataSource control that serves exactly this purpose. The XMLDataSource can take up any static XML file that contains XML data.
Ex:
<asp:XmlDataSource ID="CategoriesXmlDataSource" runat="server" DataFile="MyXml.xml"></asp:XmlDataSource>
The XmlDataSource also has a XPath property that is used to filter data in the xml.In case the data to be bound comes from database, we can use the Data property of XmlDataSource control to directly bind the xml string from database to the treeview. From the example we have taken on the Categories and Sub categories, we intend to show check boxes on the treeview, and also want the check boxes to be in checked state according to how the profile has been updated for the person. Let us now check on how we can achieve this.
The first step is to write a proper query that gives an xml document as output. This Xml document must basically contain the entire hierarchial structure that must be displayed as a treeview.If SQL Server is your database, you can easily achieve this by using joins and using the "for xml auto" clause in your query.
Now if you wish to bind the checked state of check boxes as well, using the data from database, you must also bring this checked state as another attribute of every node.
Ex: The xml from database must be something like:
<Categories>
<Category ID="1" Name="Books" checked="false">
<SubCategory Id="2" Name="Religon" checked="false">
<SubSubCategory Id="Hinduism" checked="true" />
<SubSubCategory Id="Christianity" checked="false" />
<SubSubCategory Id="Islam" checked="true" />
</SubCategory>
</Category>
</Categories>
The next step is to make this xml from database to be the datasource for XmlDatasource control. To do this, add this declaration in your aspx page:
<asp:XmlDataSource ID="XmlDataSource1" runat="server" XPath="/Categories/*"></asp:XmlDataSource>
The XPath expression filtes out the top root node and displays the rest of the nodes.
Now in the code behind page add this code in Page_load event:
XmlDataSource1.Data = GetXmlData();
The GetXmlData method retuns the entire xml structure as shown above from database.
The final step is to bind the Treeview control with this XmlDataSource. This is done using the <DataBindings> property of the ASP.NET Treeview.
To the <DataBindings> of the Treeview we add the TreeNodeBinding, for each of the different levels in the TreeView.
For this, add the following declaration in your aspx page:
<asp:TreeView runat="server" ID="tvwCategories" ExpandDepth=1 OnTreeNodeDataBound="tvwCategories_TreeNodeDataBound" ShowCheckBoxes="All" >
<DataBindings>
<asp:TreeNodeBinding DataMember="Country" SelectAction=None PopulateOnDemand=true TargetField="checked" ValueField="ID" extField="Name"></asp:TreeNodeBinding>
<asp:TreeNodeBinding DataMember="Geography" PopulateOnDemand=true SelectAction=None TargetField="checked" ValueField="ID" TextField="Name"></asp:TreeNodeBinding>
<asp:TreeNodeBinding DataMember="Region" TargetField="checked" SelectAction=None PopulateOnDemand=true ValueField="ID" TextField="Name"></asp:TreeNodeBinding>
<asp:TreeNodeBinding DataMember="State" TargetField="checked" SelectAction=None PopulateOnDemand=true ValueField="ID" TextField="Name"></asp:TreeNodeBinding> </DataBindings>
</asp:TreeView>
The DataMember property in TreeNodeBinding is used to specify the different XML elements that will be bound to the TreeView.
The ValueField and TextField properties correspond to the Xml attributes that will assign the Text and Value fields to each node in the TreeView.
The TargetField is here used to set the Checked state of the nodes from the corresponding Xml attribute (i.e. checked). (The TargetField in actual usage is for assigning the "target" html attribute, so that any link from the TreeView will open in the target window accordingly.)
The SelectAction=None specifies that the nodes in the TreeView do not have links or any other click action.
Note the method that is called in OnTreeNodeDataBound event. This method will basically set the checked state of the checkboxes.
The following is the code for the event that has to be added in the codebehind page:
protected void tvwCategories_TreeNodeDataBound(object sender, TreeNodeEventArgs e)
{
if (e.Node.Target == Convert.ToString("true"))
{
e.Node.Checked = true;
}
else
{
e.Node.Checked = false;
}
}
The page is now ready to be compiled and browsed. Of course, there are several ways to set the checked state of checkboxes in treeviews. However, using the above method we avoid the unnecessary for/foreach loops that may have to be used for doing the same.
Thanks.
Thursday, April 20, 2006
ASP.NET : Export to Excel/Word from Nested GridViews
Exporting a GridView to an Excel/Word is one common requirement in ASP.NET applications. In case of simple GridViews this is a pretty easy and the code for the same can be found in my earlier article.
In case of Nested GridViews, when trying to export to Word/Excel, the output comes would always be rendered inverted in Word/Excel.
In this scenario, let us see how we can export the entire Nested GridView.
The first step is to insert a <div > that embeds the entire Nested GridView.
For Ex :
<div id="divNestedGrid" runat="server">
<asp:GridView id=.. >
...
<asp:GridView .... />
---
</asp:GridView>
</asp:GridView>
</div>
Next step is add a hidden variable in the same aspx form.
<input type="hidden" id="hdnInnerHtml" value="" runat="server" />
Now add a javascript function that in the aspx that fills the hidden variable with the inner html of the div.
function getInnerHtml()
{
var element = document.getElementById("divpreview");
var store = document.getElementById("hdnInnerHtml");
//add the css styles you have used inside the nested GridView
var css = "<style type=\"text/css\" id=\"style1\">.textbold {font-family: Arial, Helvetica, sans-serif;font-size: 11px;color: #000000;font-weight: bold;text-decoration: none;}.row1 {background-color: #FFFFFF; font-family: Arial, Helvetica, sans-serif;font-size: 11px;color: #000000;height: 18px;padding-left: 5px;}.;
store.value = css + element.innerHTML;
}
Now in the Code Behind, first add the javascript function to be triggered on the click on the Export button.
btnExport.Attributes.Add("OnClick", "getInnerHtml();");
Finally, write the following code in the Export Button click event, to Export to Word:
string html = hdnInnerHtml.Value;
Response.Cache.SetExpires(DateTime.Now.AddSeconds(1));
Response.Clear();
Response.AppendHeader("content-disposition", "attachment;filename=FileName.doc");
Response.Charset = "";
Response.Cache.SetCacheability(HttpCacheability.NoCache);
Response.ContentType = "application/vnd.ms-word";
this.EnableViewState = false;
Response.Write("\r\n");
Response.Write(html);
Response.End();
In case of Exporting to Excel, you can change the code as follows:
string html = hdnInnerHtml.Value;
Response.Cache.SetExpires(DateTime.Now.AddSeconds(1));
Response.Clear();
Response.AppendHeader("content-disposition", "attachment;filename=FileName.xls");
Response.Charset = "";
Response.Cache.SetCacheability(HttpCacheability.NoCache);
Response.ContentType = "application/vnd.ms-excel";
this.EnableViewState = false;
Response.Write("\r\n");
Response.Write(html);
Response.End();
In this article we discussed different ways of Exporting Data to Excel and Word when dealing with Nested Grid Views.
Thanks.
Friday, March 24, 2006
ASP.NET 2.0 - Explicit Localization in different Languages
In my previous article on ASP.NET 2.0 localization, I had mentioned how easily you can localize your applications using Automatic Localization feature present in Visual Studio 2005.
In this article let us see how we can explicitly set the localization of a page in different languages.
Let us assume we have a page in four different languages. Instead of getting the localization information from the browser settings, we will now see how we can explicitly get the same page in different languages on clicking four links (French, Spanish, German, English) on the page.
On clicking on each of these links, the page has to get loaded in the respective languages. Let me describe how this can be achieved.
The first step is to override the InitializeCulture method to load set the culture settings. To get the culture that is set by each of the Link buttons, we store the culture information in a Session object (Profile object may also be used). The following is the InitializeCulture method:
protected override void InitializeCulture()
{
// override virtual method InitializeCulture() to check if session contains a language setting
if (Session["PreferredCulture"] != null)
{
string UserCulture = Session["PreferredCulture"].ToString();
if (UserCulture != "")
{
System.Threading.Thread.CurrentThread.CurrentUICulture = new CultureInfo(UserCulture);
System.Threading.Thread.CurrentThread.CurrentCulture = CultureInfo.CreateSpecificCulture(UserCulture);
}
}
else
{
string UserCulture = ConfigurationSettings.AppSettings["ApplicationCulture"].ToString();
System.Threading.Thread.CurrentThread.CurrentUICulture = new CultureInfo(UserCulture);
System.Threading.Thread.CurrentThread.CurrentCulture = CultureInfo.CreateSpecificCulture(UserCulture);
}
}
As you can see, for the first time page loads, the culture of the page is set from the config file settings. Subsequent loads of the page after the click of each link button, we set the culture from the Session object.
Now let us see what code has to come in for each Link button click event. This event must set the selected language culture in the Session object, and then must force re-load of the page. The code is as follows for French Language:
protected void frenchLinkButton_Click(object sender, EventArgs e)
{
string SelectedLanguage = "fr";
Session["PreferredCulture"] = SelectedLanguage;
//Force re-initialization of the page to fire InitializeCulture()
Response.Redirect(Request.Url.LocalPath);
}
The same code has to be re-written for other languages:
For Spanish Language:
protected void spanishLinkButton1_Click(object sender, EventArgs e)
{
string SelectedLanguage = "es";
Session["PreferredCulture"] = SelectedLanguage;
//Force re-initialization of the page to fire InitializeCulture()
Response.Redirect(Request.Url.LocalPath);
}
For German Language:
protected void germanLinkButton_Click(object sender, EventArgs e)
{
string SelectedLanguage = "de";
Session["PreferredCulture"] = SelectedLanguage;
//Force re-initialization of the page to fire InitializeCulture()
Response.Redirect(Request.Url.LocalPath);
}
For English language:
protected void englishLinkButton_Click(object sender, EventArgs e)
{
string SelectedLanguage = "en-US";
Session["PreferredCulture"] = SelectedLanguage;
//Force re-initialization of the page to fire InitializeCulture()
Response.Redirect(Request.Url.LocalPath);
}
Of course, to get the respective language page loaded, you must have the following resx files in containg text in respective languages, in your App_LocalResources folder, assuming your page is Default.aspx:
Default.aspx.es.resx
Default.aspx.fr.resx
Default.aspx.resx
Default.aspx.de.resx
If you have a large application that has many pages that require explicit localization, you can have a Base class that inherits System.Web.UI.Page and put the InitializeCulture method in that Base class. All pages in your application can be made to inherit this Base class.
In this article let us see how we can explicitly set the localization of a page in different languages.
Let us assume we have a page in four different languages. Instead of getting the localization information from the browser settings, we will now see how we can explicitly get the same page in different languages on clicking four links (French, Spanish, German, English) on the page.
On clicking on each of these links, the page has to get loaded in the respective languages. Let me describe how this can be achieved.
The first step is to override the InitializeCulture method to load set the culture settings. To get the culture that is set by each of the Link buttons, we store the culture information in a Session object (Profile object may also be used). The following is the InitializeCulture method:
protected override void InitializeCulture()
{
// override virtual method InitializeCulture() to check if session contains a language setting
if (Session["PreferredCulture"] != null)
{
string UserCulture = Session["PreferredCulture"].ToString();
if (UserCulture != "")
{
System.Threading.Thread.CurrentThread.CurrentUICulture = new CultureInfo(UserCulture);
System.Threading.Thread.CurrentThread.CurrentCulture = CultureInfo.CreateSpecificCulture(UserCulture);
}
}
else
{
string UserCulture = ConfigurationSettings.AppSettings["ApplicationCulture"].ToString();
System.Threading.Thread.CurrentThread.CurrentUICulture = new CultureInfo(UserCulture);
System.Threading.Thread.CurrentThread.CurrentCulture = CultureInfo.CreateSpecificCulture(UserCulture);
}
}
As you can see, for the first time page loads, the culture of the page is set from the config file settings. Subsequent loads of the page after the click of each link button, we set the culture from the Session object.
Now let us see what code has to come in for each Link button click event. This event must set the selected language culture in the Session object, and then must force re-load of the page. The code is as follows for French Language:
protected void frenchLinkButton_Click(object sender, EventArgs e)
{
string SelectedLanguage = "fr";
Session["PreferredCulture"] = SelectedLanguage;
//Force re-initialization of the page to fire InitializeCulture()
Response.Redirect(Request.Url.LocalPath);
}
The same code has to be re-written for other languages:
For Spanish Language:
protected void spanishLinkButton1_Click(object sender, EventArgs e)
{
string SelectedLanguage = "es";
Session["PreferredCulture"] = SelectedLanguage;
//Force re-initialization of the page to fire InitializeCulture()
Response.Redirect(Request.Url.LocalPath);
}
For German Language:
protected void germanLinkButton_Click(object sender, EventArgs e)
{
string SelectedLanguage = "de";
Session["PreferredCulture"] = SelectedLanguage;
//Force re-initialization of the page to fire InitializeCulture()
Response.Redirect(Request.Url.LocalPath);
}
For English language:
protected void englishLinkButton_Click(object sender, EventArgs e)
{
string SelectedLanguage = "en-US";
Session["PreferredCulture"] = SelectedLanguage;
//Force re-initialization of the page to fire InitializeCulture()
Response.Redirect(Request.Url.LocalPath);
}
Of course, to get the respective language page loaded, you must have the following resx files in containg text in respective languages, in your App_LocalResources folder, assuming your page is Default.aspx:
Default.aspx.es.resx
Default.aspx.fr.resx
Default.aspx.resx
Default.aspx.de.resx
If you have a large application that has many pages that require explicit localization, you can have a Base class that inherits System.Web.UI.Page and put the InitializeCulture method in that Base class. All pages in your application can be made to inherit this Base class.
Friday, February 24, 2006
ASP.NET 2.0 Localization - using Visual Studio 2005
Lot of improvements have happened in ASP.NET 2.0 with regard to localizing applications.
This article will take you step by step in localizing your ASP.NET applications.For the scope of the article, we will maintain all localization entries in .resx file, although you can also maintain this using database.
ASP.NET 2.0 provides the feature of automatically localizing your pages and also manual localization. Let us look at each of these.
The following are the steps for automatic localization through VS 2005:
1. Complete your ASP.NET page with all controls.
2. Switch to design view of your page from your VS 2005 IDE.
3. From the Tools menu, click Generate Local Resource.
This will generate all resource strings needed for all controls on your page.
4. Notice that your working folder will now have another folder added to it, by name App_LocalResources. This will contain the resource file for the page for which you generated Local resources.
If you now look at the aspx code, you will find that, every control on the page that can be localizable has a meta:resourcekey attribute added to it.
Now just in case you find that the meta:resourcekey attribute has not been added to the text (this happens quite rarely - one place where I found was the Next - Previous text in a GridView), all you need to do is to add Key- Value entry in the local resource file, say,YourPage.aspx.resx and then add this attribute to the control:
NextPageText="<%$ Resources:Next %>"
Manual Localization:
In cases where you want to dynamically assign a localized text to a string, the following are the steps:
1. Right click on your Web Project, point to Add ASP.NET Folder and then click App_GlobalResources.
2. Right click on the folder, and then click Add new Item.
3. Choose Resource file under Templates, and name the new file as GlobalResources.resx.
4. Add a Key - Value pair in this .resx file, say, with Key as FName and Value as First Name.
5. Open the code-behind of the page in your application where you want to access this Key.
6. Suppose you want to assign it to a label control, you must call the resource value this way:
lblFName.Text = Resources.GlobalResources.FName;
In the next article, we will discuss on some more points on localization configurations.
This article will take you step by step in localizing your ASP.NET applications.For the scope of the article, we will maintain all localization entries in .resx file, although you can also maintain this using database.
ASP.NET 2.0 provides the feature of automatically localizing your pages and also manual localization. Let us look at each of these.
The following are the steps for automatic localization through VS 2005:
1. Complete your ASP.NET page with all controls.
2. Switch to design view of your page from your VS 2005 IDE.
3. From the Tools menu, click Generate Local Resource.
This will generate all resource strings needed for all controls on your page.
4. Notice that your working folder will now have another folder added to it, by name App_LocalResources. This will contain the resource file for the page for which you generated Local resources.
If you now look at the aspx code, you will find that, every control on the page that can be localizable has a meta:resourcekey attribute added to it.
Now just in case you find that the meta:resourcekey attribute has not been added to the text (this happens quite rarely - one place where I found was the Next - Previous text in a GridView), all you need to do is to add Key- Value entry in the local resource file, say,YourPage.aspx.resx and then add this attribute to the control:
NextPageText="<%$ Resources:Next %>"
Manual Localization:
In cases where you want to dynamically assign a localized text to a string, the following are the steps:
1. Right click on your Web Project, point to Add ASP.NET Folder and then click App_GlobalResources.
2. Right click on the folder, and then click Add new Item.
3. Choose Resource file under Templates, and name the new file as GlobalResources.resx.
4. Add a Key - Value pair in this .resx file, say, with Key as FName and Value as First Name.
5. Open the code-behind of the page in your application where you want to access this Key.
6. Suppose you want to assign it to a label control, you must call the resource value this way:
lblFName.Text = Resources.GlobalResources.FName;
In the next article, we will discuss on some more points on localization configurations.
Monday, January 23, 2006
ASP.NET : Make "Export to Excel" always open excel in a separate Window
Export to Excel in ASP.NET is a very common feature, which I'm sure everyone who has worked in ASP.NET would have had the chance to implement.
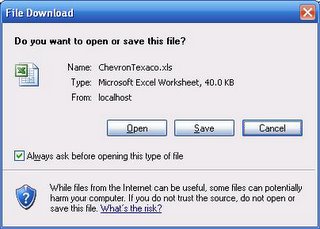
Whenever we choose the Export to Excel option from our Application, a dialog box pops us with the option to Open or to Save, as shown below:
{
try
{
string strFileName = String.Empty, strFilePath= String.Empty;
strFilePath = Server.MapPath(@"../Excel/") + "ExcelFileName" + ".xls";
if (File.Exists(strFilePath))
{
File.Delete(strFilePath);
}
System.IO.StringWriter oStringWriter =new StringWriter();
System.Web.UI.HtmlTextWriter oHtmlTextWriter = new HtmlTextWriter(oStringWriter);
StreamWriter objStreamWriter;
string strStyle =@"
";
objStreamWriter = File.AppendText(strFilePath);
dgExport.RenderControl(oHtmlTextWriter);
objStreamWriter.WriteLine(strStyle);
objStreamWriter.WriteLine(oStringWriter.ToString());
objStreamWriter.Close();
string strScript = "<script language=JavaScript>window.open('../Excel/" + "ExcelFileName" +
".xls','dn','width=1,height=1,toolbar=no,top=300,left=400,right=1,
Whenever we choose the Export to Excel option from our Application, a dialog box pops us with the option to Open or to Save, as shown below:
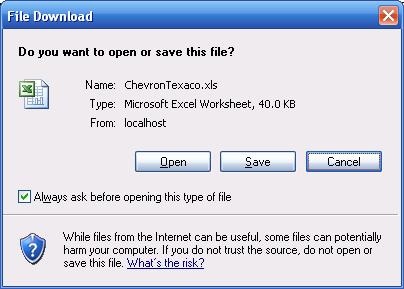
By chance if the user checks off the option "Always ask before opening this type of file", from next time the user will not be able to see the dialog box. Instead, the excel file opens up in the same window.
To set back this option, the following steps can be followed:
1. Go to Windows Explorer.
2. On the Tools menu, click Folder Options, and then click on the File Types tab.
3. From the Registered file types list box, select the XLS extension, and then click Advanced.
4. In the Edit File Type dialog box, set the Confirm open after download to selected.
5. Make sure the Browse in same window option is not selected, and then click OK.
The above steps will make sure that we get the dialog box as shown above. However, since this is an option set at the client computer, these steps cannot be mandated to be followed in every computer that browses the application.
So, from the code level, we must make sure that the excel file is opened in a separate window. One possible option for this is to Save the file to the web server, and then open the file in a separate window.
The code for this is given below:
{
try
{
string strFileName = String.Empty, strFilePath= String.Empty;
strFilePath = Server.MapPath(@"../Excel/") + "ExcelFileName" + ".xls";
if (File.Exists(strFilePath))
{
File.Delete(strFilePath);
}
System.IO.StringWriter oStringWriter =new StringWriter();
System.Web.UI.HtmlTextWriter oHtmlTextWriter = new HtmlTextWriter(oStringWriter);
StreamWriter objStreamWriter;
string strStyle =@"
";
objStreamWriter = File.AppendText(strFilePath);
dgExport.RenderControl(oHtmlTextWriter);
objStreamWriter.WriteLine(strStyle);
objStreamWriter.WriteLine(oStringWriter.ToString());
objStreamWriter.Close();
string strScript = "<script language=JavaScript>window.open('../Excel/" + "ExcelFileName" +
".xls','dn','width=1,height=1,toolbar=no,top=300,left=400,right=1,
scrollbars=no,locaton=1,resizable=1');</script>";
if(!Page.IsStartupScriptRegistered("clientScript"))
{
Page.RegisterStartupScript("clientScript", strScript);
}
}
catch(Exception)
{
//Handle Exception
}
}
In the above method, the file is saved to the Web Server inside the folder "Excel". Of course, this folder must have write permissions for the user. But it will definitely ensure that the excel file is opened in a new window in the client computer.
Cheers.
Enterprise Library for .NET Framework 2.0 released
Microsoft has released the Enterprise Library for .NET Framework 2.0 this month !!!
Within just two months from the release of .NET Framework 2.0, the release of Enterprise Library for the same comes as a pleasant surprise, thanks to the hard work put by the Team.
With just a quick glance, I could note that the following features have been added newly:
1. In the DAAB (Data Access Application Block), you can dynamically create Connection strings and use them
2. The DAAB includes Database-derived classes for Microsoft SQL Server and Oracle.
3. There is something called the GenericDatabase class in DAAB that can be used to access OLE-DB and ODBC databases.
4. The Configuration Application Block has been removed and its now based on System.Configuration namespace.
For more details and downloading, check http://msdn.microsoft.com/library/en-us/dnpag2/html/EntLib2.asp
Happy Exploring!!!
Within just two months from the release of .NET Framework 2.0, the release of Enterprise Library for the same comes as a pleasant surprise, thanks to the hard work put by the Team.
With just a quick glance, I could note that the following features have been added newly:
1. In the DAAB (Data Access Application Block), you can dynamically create Connection strings and use them
2. The DAAB includes Database-derived classes for Microsoft SQL Server and Oracle.
3. There is something called the GenericDatabase class in DAAB that can be used to access OLE-DB and ODBC databases.
4. The Configuration Application Block has been removed and its now based on System.Configuration namespace.
For more details and downloading, check http://msdn.microsoft.com/library/en-us/dnpag2/html/EntLib2.asp
Happy Exploring!!!
Wednesday, December 28, 2005
ASP.NET : Trigger an Event in the Parent Page from within a Page inside IFrame
Web Applications have started dominating the traditional Windows based applications and in the process, the requirements are ever increasing and in many situations we find that too many functionalities need to come as part of a single page.
At this point we resolve to break down each of these functionalities as separate pages and try to call these pages inside an IFrame. This will ensure that the page does not become too heavy and also easy maintainability.
The problem starts when an event has to be triggered in the parent page after an event occurs inside the IFrame. Now let us take an example before I explain how this can be accomplished.
Let us say we have a page that contains Product information. I have some ten list of options like adding categories of a Product, Viewing Product information, etc.
Now for all these I want to give a singly entry system, with my Parent page where I show up all the products in a list box. On top of this I have all the ten options specified. All the other functionalities are taken to ten different pages. I keep an IFrame beside my ListBox that calls the 10 different pages.The aspx page for the Parent Page (say ProductHome.aspx) will have this code:
<table class="table" height="60%" width="80%" align="center" border="0">
<tr>
<td width="20%" height="100%">
<asp:linkbutton id="lnkAddProduct" CssClass="sublink" Runat="server" text="Add a New Product"></asp:linkbutton>
<asp:listbox id="lstProducts" CssClass="textbox" Runat="server" width="100%" Rows="10" AutoPostBack="True" ></asp:listbox></td>
<td width="80%" height="100%"><iframe id="MyFrame" style="WIDTH: 100%; HEIGHT: 100%" name="main" src="" frameBorder="0" scrolling="yes" height="100%" runat="server"></iframe>
</td>
</tr>
</table>
On click of every product I show up the page that displays Product information. Another page is for creating a new Product. Whenever I create a new Product in a page inside an IFrame, I must be able to add that product to the ListBox in the Parent page.
For this to happen, all I need to do is just a few lines of code in the code behind of the child page that contains the new Product information (let us call it AddProduct.aspx). In the Button Click Event (say btnSave_Click), after saving the information to the database:
Session["BindProducts"] = "true";
Session["Page"] = "AddProduct.aspx";
Session["ShowMessage"] = "The Product was added successfully";
Page.RegisterStartupScript("RefreshParent","<script language='javascript'>RefreshParent()</script>");
All that the above code does is to refresh the parent page after setting a few Session variables.
Now in the aspx page of the child page, add the following script block:
<script language="javascript">
function RefreshParent()
{
window.parent.location.href = "ParentPage.aspx";
}
</script>
So now when the Parent Page refreshes, you must bind the ListBox again with the new Product added. For this to happen, add the following code in Page_Load event of Parent Page (ProductHome.aspx):
if(Session["BindProducts"] != null)
{
if(Session["BindProducts"].ToString() == "true")
{
//Call the function to Bind the Products list box again
BindProducts();
}
}
And now remember to set the IFrame's src attribute to your child Page with a message displaying that the Product was added successfully. This will give the end user a feeling that he is only working with the one single page. Add the following code in Page_Load event of ProductHome.aspx to set the URL of the IFrame:
#region Set URL of IFrame
if(Session["Page"] != null)
{
string url = Session["Page"].ToString();
HtmlControl MyFrame = (HtmlControl)this.FindControl("MyFrame");
MyFrame.Attributes["src"] = url;
Session["Page"] = null;
}
#endregion
Now as a last step, display the message that the Product was added in the Child Page. Add the following code in Page_Load event of the Child Page (AddProduct.aspx):
if(Session["ShowMessage"] != null)
{
lblVisitsAdded.Text = Session["ShowMessage"].ToString();
Session["ShowMessage"] = null;
}
The above steps can be repeated for all the other functionalities.
At this point we resolve to break down each of these functionalities as separate pages and try to call these pages inside an IFrame. This will ensure that the page does not become too heavy and also easy maintainability.
The problem starts when an event has to be triggered in the parent page after an event occurs inside the IFrame. Now let us take an example before I explain how this can be accomplished.
Let us say we have a page that contains Product information. I have some ten list of options like adding categories of a Product, Viewing Product information, etc.
Now for all these I want to give a singly entry system, with my Parent page where I show up all the products in a list box. On top of this I have all the ten options specified. All the other functionalities are taken to ten different pages. I keep an IFrame beside my ListBox that calls the 10 different pages.The aspx page for the Parent Page (say ProductHome.aspx) will have this code:
<table class="table" height="60%" width="80%" align="center" border="0">
<tr>
<td width="20%" height="100%">
<asp:linkbutton id="lnkAddProduct" CssClass="sublink" Runat="server" text="Add a New Product"></asp:linkbutton>
<asp:listbox id="lstProducts" CssClass="textbox" Runat="server" width="100%" Rows="10" AutoPostBack="True" ></asp:listbox></td>
<td width="80%" height="100%"><iframe id="MyFrame" style="WIDTH: 100%; HEIGHT: 100%" name="main" src="" frameBorder="0" scrolling="yes" height="100%" runat="server"></iframe>
</td>
</tr>
</table>
On click of every product I show up the page that displays Product information. Another page is for creating a new Product. Whenever I create a new Product in a page inside an IFrame, I must be able to add that product to the ListBox in the Parent page.
For this to happen, all I need to do is just a few lines of code in the code behind of the child page that contains the new Product information (let us call it AddProduct.aspx). In the Button Click Event (say btnSave_Click), after saving the information to the database:
Session["BindProducts"] = "true";
Session["Page"] = "AddProduct.aspx";
Session["ShowMessage"] = "The Product was added successfully";
Page.RegisterStartupScript("RefreshParent","<script language='javascript'>RefreshParent()</script>");
All that the above code does is to refresh the parent page after setting a few Session variables.
Now in the aspx page of the child page, add the following script block:
<script language="javascript">
function RefreshParent()
{
window.parent.location.href = "ParentPage.aspx";
}
</script>
So now when the Parent Page refreshes, you must bind the ListBox again with the new Product added. For this to happen, add the following code in Page_Load event of Parent Page (ProductHome.aspx):
if(Session["BindProducts"] != null)
{
if(Session["BindProducts"].ToString() == "true")
{
//Call the function to Bind the Products list box again
BindProducts();
}
}
And now remember to set the IFrame's src attribute to your child Page with a message displaying that the Product was added successfully. This will give the end user a feeling that he is only working with the one single page. Add the following code in Page_Load event of ProductHome.aspx to set the URL of the IFrame:
#region Set URL of IFrame
if(Session["Page"] != null)
{
string url = Session["Page"].ToString();
HtmlControl MyFrame = (HtmlControl)this.FindControl("MyFrame");
MyFrame.Attributes["src"] = url;
Session["Page"] = null;
}
#endregion
Now as a last step, display the message that the Product was added in the Child Page. Add the following code in Page_Load event of the Child Page (AddProduct.aspx):
if(Session["ShowMessage"] != null)
{
lblVisitsAdded.Text = Session["ShowMessage"].ToString();
Session["ShowMessage"] = null;
}
The above steps can be repeated for all the other functionalities.
Thursday, December 22, 2005
How To : Create a Dynamic Time Table in ASP.NET
There will be many times where you will need to have a time table in your applications.
For ex. Think of a travel agency person who wants to mark that the buses/transport facilities would be available on specific times - on specific days. This availability information is prone to have frequent changes and therefore must be editable also.
Lets suppose that we maintain two tables - one for number of days the bus will run on like Sunday, Monday, etc. - we will call it AvailabilityDays, and one for the timings - such as 8:30, 9:00, 9:30, 11:30, 12:30 , etc. called AvailabilityTimes.
All we need is an editable grid with checkboxes, with columns as AvailabilityTimes and rows as the AvailabilityDays.
The first step is to get data through a Stored Procedure into a DataSet. The following code gets the code into a DataSet from an SP that has just 2 select statements from the
DataTable avDaysTable = new DataTable();
DataTable avTimeTable = new DataTable();
DataSet ds = new DataSet();
SqlConnection sqlCon = new SqlConnection("server=[servername];uid=[username];pwd=[password];database=[database]");
SqlCommand cmd = new SqlCommand("GetAvailabilityDaysAndTime",sqlCon);
cmd.CommandType = CommandType.StoredProcedure;
SqlDataAdapter dAdapter = new SqlDataAdapter(cmd);
dAdapter.Fill(ds);
avDaysTable = ds.Tables[0];
avTimeTable = ds.Tables[1];
Now that we have two datatables with Days and Times, we now need to construct a dynamic table containing these. For that we first declare an empty table in the aspx page:
Now to build the dynamic time table, we first take the count of the columns that need to come, and first construct the header row with the number of columns.
For ex. Think of a travel agency person who wants to mark that the buses/transport facilities would be available on specific times - on specific days. This availability information is prone to have frequent changes and therefore must be editable also.
Lets suppose that we maintain two tables - one for number of days the bus will run on like Sunday, Monday, etc. - we will call it AvailabilityDays, and one for the timings - such as 8:30, 9:00, 9:30, 11:30, 12:30 , etc. called AvailabilityTimes.
All we need is an editable grid with checkboxes, with columns as AvailabilityTimes and rows as the AvailabilityDays.
The first step is to get data through a Stored Procedure into a DataSet. The following code gets the code into a DataSet from an SP that has just 2 select statements from the
DataTable avDaysTable = new DataTable();
DataTable avTimeTable = new DataTable();
DataSet ds = new DataSet();
SqlConnection sqlCon = new SqlConnection("server=[servername];uid=[username];pwd=[password];database=[database]");
SqlCommand cmd = new SqlCommand("GetAvailabilityDaysAndTime",sqlCon);
cmd.CommandType = CommandType.StoredProcedure;
SqlDataAdapter dAdapter = new SqlDataAdapter(cmd);
dAdapter.Fill(ds);
avDaysTable = ds.Tables[0];
avTimeTable = ds.Tables[1];
Now that we have two datatables with Days and Times, we now need to construct a dynamic table containing these. For that we first declare an empty table in the aspx page:
Now to build the dynamic time table, we first take the count of the columns that need to come, and first construct the header row with the number of columns.
int columnCount = avTimeTable.Rows.Count;
TableItemStyle tableStyle = new TableItemStyle();
tableStyle.HorizontalAlign = HorizontalAlign.Center;
tableStyle.VerticalAlign = VerticalAlign.Middle;
tableStyle.Width = Unit.Pixel(100);
tableStyle.CssClass = "button-editable-heading";
TableRow headerrow;
TableCell headerCell;
headerCell = new TableCell();
headerCell.Text = "";
headerrow = new TableRow();
headerrow.Cells.Add(headerCell);
for(int i=0;i<avTimeTable.Rows.Count;i++)
{
headerCell = new TableCell();
headerCell.Text = avTimeTable.Rows[i][1].ToString();
headerrow.Cells.Add(headerCell);
}
headerrow.ApplyStyle(tableStyle);
MyTable.Rows.Add(headerrow);
Next, for each of the columns in the header, we now need to add as many number of days as in the AvailabilityDays table. This will constitute the rows of the table. To each of these rows, we also need to add a Checkbox so that the availability for a day and for a particular time can be set. Finally, add these rows to the main table to complete the time table grid.
CheckBox chk;
for(int i=0;i<avDaysTable.Rows.Count;i++)
{
//add rows to first column
headerrow = new TableRow();
headerrow.ID = i.ToString();
headerCell = new TableCell();
headerCell.Text = avDaysTable.Rows[i][1].ToString();
headerCell.ApplyStyle(tableStyle);
headerrow.Cells.Add(headerCell);
for(int j=0;j<avTimeTable.Rows.Count;j++)
{
headerCell = new TableCell();
chk = new CheckBox();
chk.ID = "chk" + i.ToString() + j.ToString();;
headerCell.Controls.Add(chk);
headerrow.Cells.Add(headerCell);
}
MyTable.Rows.Add(headerrow);
}
MyTable.Rows.Add(headerrow);
Thats it. We now have a time table grid ready to take the values for any day any time. In the next article, I'll explain how we can store and retrieve values in the time table.
How to : Get Excel data into a .NET DataSet object
There may be requirement where in data in an Excel sheet has to be manipulated inside .NET Applications. Although there are many ways to achieve this (like using Excel object of COM), the most preferred way is to use the .NET Data providers to achieve this.
The following is a sample code that can be used to get Excel data into a .NET Dataset object.
The parameter excelSheetName in the below method is the name of the Excel sheet and the sheetNumber parameter indicates the number of the sheet (out of all the sheets in an Excel file).
public DataSet RetrieveExcelData(string excelSheetName,int sheetNumber)
{
OleDbConnection objConn = null;
System.Data.DataTable dt = null;
try
{
// Connection String.
String connString = "Provider=Microsoft.Jet.OLEDB.4.0;" +
"Data Source=" + excelSheetName + ";Extended Properties=Excel 8.0;";
// Create connection object by using the preceding connection string.
objConn = new OleDbConnection(connString);
// Open connection with the database.
objConn.Open();
// Get the data table containg the schema guid.
dt = objConn.GetOleDbSchemaTable(OleDbSchemaGuid.Tables, null);
if(dt == null)
{
return null;
}
String[] excelSheets = new String[dt.Rows.Count];
int i = 0;
// Add the sheet name to the string array.
foreach(DataRow row in dt.Rows)
{
excelSheets[i] = row["TABLE_NAME"].ToString();
i++;
if(i==sheetNumber)
break;
}
OleDbCommand excelCommand = new OleDbCommand("Select * from ["+excelSheets[sheetNumber-1]+"]",objConn);
OleDbDataAdapter excelAdapter = new OleDbDataAdapter(excelCommand);
DataSet excelDataSet = new DataSet();
excelAdapter.Fill(excelDataSet);
return excelDataSet;
}
catch(OleDbException ex)
{
throw ex;
}
catch(Exception ex)
{
throw ex;
}
finally
{
// Clean up.
if(objConn != null)
{
objConn.Close();
objConn.Dispose();
}
if(dt != null)
{
dt.Dispose();
}
}
}
Through the above method, we avoid the extra reference of the COM dll and also get the flexibility of manipulating Excel shett data through ADO.NET.
The following is a sample code that can be used to get Excel data into a .NET Dataset object.
The parameter excelSheetName in the below method is the name of the Excel sheet and the sheetNumber parameter indicates the number of the sheet (out of all the sheets in an Excel file).
public DataSet RetrieveExcelData(string excelSheetName,int sheetNumber)
{
OleDbConnection objConn = null;
System.Data.DataTable dt = null;
try
{
// Connection String.
String connString = "Provider=Microsoft.Jet.OLEDB.4.0;" +
"Data Source=" + excelSheetName + ";Extended Properties=Excel 8.0;";
// Create connection object by using the preceding connection string.
objConn = new OleDbConnection(connString);
// Open connection with the database.
objConn.Open();
// Get the data table containg the schema guid.
dt = objConn.GetOleDbSchemaTable(OleDbSchemaGuid.Tables, null);
if(dt == null)
{
return null;
}
String[] excelSheets = new String[dt.Rows.Count];
int i = 0;
// Add the sheet name to the string array.
foreach(DataRow row in dt.Rows)
{
excelSheets[i] = row["TABLE_NAME"].ToString();
i++;
if(i==sheetNumber)
break;
}
OleDbCommand excelCommand = new OleDbCommand("Select * from ["+excelSheets[sheetNumber-1]+"]",objConn);
OleDbDataAdapter excelAdapter = new OleDbDataAdapter(excelCommand);
DataSet excelDataSet = new DataSet();
excelAdapter.Fill(excelDataSet);
return excelDataSet;
}
catch(OleDbException ex)
{
throw ex;
}
catch(Exception ex)
{
throw ex;
}
finally
{
// Clean up.
if(objConn != null)
{
objConn.Close();
objConn.Dispose();
}
if(dt != null)
{
dt.Dispose();
}
}
}
Through the above method, we avoid the extra reference of the COM dll and also get the flexibility of manipulating Excel shett data through ADO.NET.
Monday, September 05, 2005
ASP.NET TextBox, Trim White Spaces within words
ASP.NET TextBox provides a lot of features which reduces many a plumbing work required in previous versions of HTML Input Type.
Some of the built-in functionalities of <asp:textbox> such as TextMode to specify whether it is a Text field, a password field or Text Area simplify the programming task and provide meaningful interfaces to work with.
One of the important tasks we do when receiving user input in TextBox is to Trim the white spaces entered by the users. This can very well minimize the size of the data as well as storage in DataStores.
Some of the built-in methods that ship with the string class are
string.TrimStart()
Removes the specified set of occurances from the Beginning of the string
string.TrimEnd()
Removes the specified set of occurances from the End of the string
string.Trim()
Removes White Spaces from Beginning & End of the string. Very useful in applications while retrieving user input to remove the white spaces.
To utilize the above functions with TextBox input entered by the users, we can simply pass TextBox1.Text.Trim(). Since TextBox1.Text returns a string of the text entered by the user.
However, if we would like to trim the extra white spaces entered by the users in the TextBox in the form of a sentence etc., then the above methods would'nt be useful.
Say the user has entered "This is a Word". We would like to save it/process it as "This is a Word", with the extra white spaces trimmed off.
To do that, we can use RegularExpressions. The following code demonstrates how we can remove extra white spaces recursively between words.
using System.Text.RegularExpressions;
private string RemoveSpaces(string str)
{
string result = "";
Regex regulEx = new Regex(@"[\s]+");
result = regulEx.Replace(str," ");
return result;
}
The above function receives a string and trims all the occurances of extra white spaces between words.
So, an input of "This is a Word" will return the output as "This is a Word"
Thanks
Some of the built-in functionalities of <asp:textbox> such as TextMode to specify whether it is a Text field, a password field or Text Area simplify the programming task and provide meaningful interfaces to work with.
One of the important tasks we do when receiving user input in TextBox is to Trim the white spaces entered by the users. This can very well minimize the size of the data as well as storage in DataStores.
Some of the built-in methods that ship with the string class are
string.TrimStart()
Removes the specified set of occurances from the Beginning of the string
string.TrimEnd()
Removes the specified set of occurances from the End of the string
string.Trim()
Removes White Spaces from Beginning & End of the string. Very useful in applications while retrieving user input to remove the white spaces.
To utilize the above functions with TextBox input entered by the users, we can simply pass TextBox1.Text.Trim(). Since TextBox1.Text returns a string of the text entered by the user.
However, if we would like to trim the extra white spaces entered by the users in the TextBox in the form of a sentence etc., then the above methods would'nt be useful.
Say the user has entered "This is a Word". We would like to save it/process it as "This is a Word", with the extra white spaces trimmed off.
To do that, we can use RegularExpressions. The following code demonstrates how we can remove extra white spaces recursively between words.
using System.Text.RegularExpressions;
private string RemoveSpaces(string str)
{
string result = "";
Regex regulEx = new Regex(@"[\s]+");
result = regulEx.Replace(str," ");
return result;
}
The above function receives a string and trims all the occurances of extra white spaces between words.
So, an input of "This is a Word" will return the output as "This is a Word"
Thanks
Friday, August 05, 2005
Exception Management Strategy for N-tier Applications - Part III
This article is in continuation of my previous two posts on Exception Management Strategy for N-tier Applications. If you havent read them, please check Part I and Part II.
Code Snipped Continued ...
The sample code for wrapping an exception that is caused in the DAL is shown below:
try
{// statements that access SQL Server
}
catch(SqlException sqlEx)
{
DataOperationFailedException dataOp = new DataOperationFailedException(sqlEx.Message,sqlEx);
dataOp.ErrorNumber = sqlEx.Number;
dataOp.SqlServerName = sqlEx.Server.ToString();
dataOp.ActionTaken = "";
dataOp.LogonUser = "";
dataOp.MstrStacktrace = sqlEx.StackTrace;
dataOp.ContextInfo = "MyNamespace.MyClass";
//Publish exception
ExceptionSQLPublisher.Publish(dataOp);
//Rethrow exception
throw dataOp;
}
The same way each module in the application can be wrapped suitably and the exception rethrown to above layer.
If the Web.config is configured to take to a specific error page, customized error messages for each type of exception cannot be shown.
So, the global.asax can be used to show customized error messages by finding the exception type that occured in the application. Here is the sample code:
protected void Application_Error(Object sender, EventArgs e)
{
Exception ex = Server.GetLastError().InnerException;
if(ex.GetType().ToString()== "Microsoft.ApplicationBlocks.
ExceptionManagement.DataOperationFailedException")
{
Response.Redirect(@"..\Error.aspx?Type=Data");
}
}
Code Snipped Continued ...
The sample code for wrapping an exception that is caused in the DAL is shown below:
try
{// statements that access SQL Server
}
catch(SqlException sqlEx)
{
DataOperationFailedException dataOp = new DataOperationFailedException(sqlEx.Message,sqlEx);
dataOp.ErrorNumber = sqlEx.Number;
dataOp.SqlServerName = sqlEx.Server.ToString();
dataOp.ActionTaken = "";
dataOp.LogonUser = "";
dataOp.MstrStacktrace = sqlEx.StackTrace;
dataOp.ContextInfo = "MyNamespace.MyClass";
//Publish exception
ExceptionSQLPublisher.Publish(dataOp);
//Rethrow exception
throw dataOp;
}
The same way each module in the application can be wrapped suitably and the exception rethrown to above layer.
If the Web.config is configured to take to a specific error page, customized error messages for each type of exception cannot be shown.
So, the global.asax can be used to show customized error messages by finding the exception type that occured in the application. Here is the sample code:
protected void Application_Error(Object sender, EventArgs e)
{
Exception ex = Server.GetLastError().InnerException;
if(ex.GetType().ToString()== "Microsoft.ApplicationBlocks.
ExceptionManagement.DataOperationFailedException")
{
Response.Redirect(@"..\Error.aspx?Type=Data");
}
}
Subscribe to:
Posts (Atom)