Part I of this article discussed on the basics of LINQ, and what DLINQ and XLINQ are.
The following is a step by step procedure in using BLINQ.
1. Download the MSI from:
http://www.asp.net/sandbox/app_blinq.aspx?tabid=622.
For using BLINQ, May 2006 CTP of LINQ must be installed in your machine.
Refer Part I of the article for this.
3. Install the MSI in your system. By default, BLINQ gets installed in C:\Program Files\Microsoft ASP.NET\BLINQ.
4. Open Visual Studio 2005. On the File Menu, point to New and then click Web Site.
5. Under Visual Studio installed templates, select ASP.NET Web Site.
6. In the Location drop down list, select File System and give the path as C:\BLINQDemo and then click OK. This creates a new Web Applcation.
7. Now click Start, and then click Run. Type cmd in the Open box and then click OK.
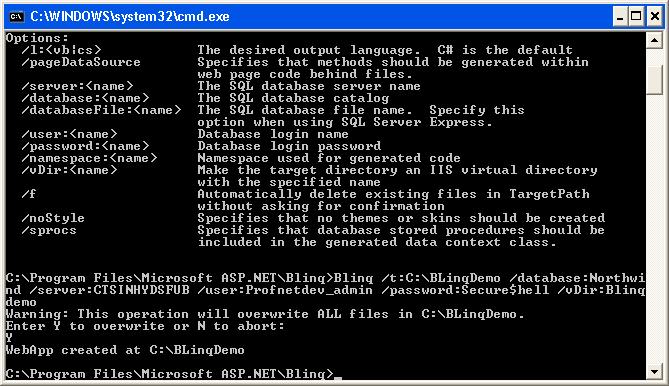
8. In the command prompt type cd "\Program Files\Microsoft ASP.NET\Blinq" .
9. Now run the BLinq tool on the created Web Site by typing the following command, replacing Servername,UserName and Password accordingly. Also copy the sameto a single line before running the command. I have split it here for postingpurposes:
Blinq /t:c:\BLINQDemo /database:Northwind /vDir:BLINQDemo
/server:ServerName /user:UserName /password:Password

10. You will be prompted if your web site can be over written. Type Y and then press enter.
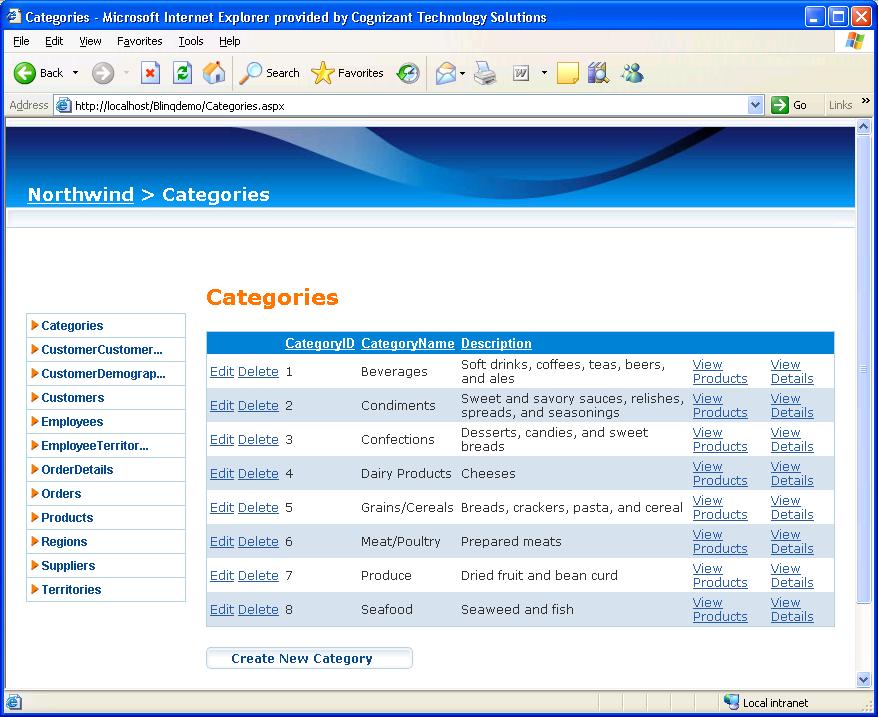
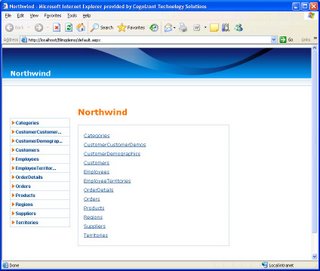
11. After successful creation, you will get a message WebApp created at C:\Blinqdemo.And the web site opens up at http://localhost/blinqdemo/categories.aspx, as shown below:
You will also be able to perform all Insert,Update,Delete, View (CRUD) options on the entire Database. The image below shows the Update,Delete and View options in Categories.

BLINQ is definitely an exciting tool for every developer. Let us wait for the next release of this tool, integrated with Visual Studio.
LINQ has been the recent buzz word as its a part of the C# 3.0 family. In this article let us take a quick look at what LINQ, DLINQ and XLINQ are all about and what BINQ - Web LINQ offers us. LINQ - Language Integrated Query is a technology that gives us the flexibility of performing query language operations in .NET. Formerly introduced as ObjectSpaces, LINQ is now available as a Community Technology Preview in http://msdn.microsoft.com/data/ref/linq.The first step is to download the May 2006 CTP from the above link and install the same in your system. The CTP requires that Visual Studio 2005 is installed in your system. On installing the same, you will find a lot of samples and documents that are given as a part of the CTP.
LINQ provies a lot of features to improve the developer productivity by minimizing a lot of data access code.Following is a sample of a query operation over an array. Such a typer of operation is not possible now in C# 2.0 and you need to loop through all elements in the array to find out the words with length 5.using System;using System.Query;using System.Collections.Generic;
class app {
static void Main() {
string[] names = { "Burke", "Connor", "Frank",
"Everett", "Albert", "George",
"Harris", "David" };
IEnumerable expr = from s in names
where s.Length == 5
orderby s
select s.ToUpper();
foreach (string item in expr)
Console.WriteLine(item);
}
}DLINQ is LINQ operated on relational data, such as data from SQL Server. The following is a sample on how
you can query the Products information in Northwind database. The metadata information of the tables
present in the Northwind database is generated using a tool called sqlmetal by pointing a particular database
to it. In the below snippet, NorthwindDataContext class contains all metadata about the entire Northwind
database.
NorthwindDataContext db = new NorthwindDataContext();
DataList1.DataSource = from p in db.Products
where p.UnitPrice > 20
orderby p.ProductName
select p;
DataList1.DataBind();XLINQ is LINQ operating on XML data. Consider the following XML block:<contacts>
<contact>
<name>Great Lakes Food</name>
<phone>(503) 555-7123</phone>
</contact>
…
</contacts>Using today's C# 2.0, we need loop through each of the customer records in the collection to build an XML as
above. XLINQ significantly improves this process. A sample code using XLINQ to build a simple XML is given below:XElement contacts = new XElement("contacts",
from c in customers
where c.Country == "USA"
select new XElement("contact",
new XElement("name", c.CompanyName),
new XElement("phone", c.Phone)
)
);
BLINQ is currently a tool, available for download at :http://www.asp.net/sandbox/app_blinq.aspx?tabid=62In the next article we will discuss on how to start using BLINQ.
During deployment of projects, many times we come across the situation to reinstall the same application with some changes to the code. Usually when we have an MSI build, the build often prompts us to uninstall the older version and reinstall the latest version.
In this article we will discuss on how to install different versions of the same application and not force overwriting the application. The steps for creating an MSI installer for ASP.NET 2.0 projects is explained in this article.
Everytime a new version of a product is installed the reason why the MSI prompts to uninstall the existing application and install a new version is due to the same ProductCode Guid that is present in both the older version and the newer version of the product.
To install different versions of the same application, follow these steps:
1. Add the setup project to your application and add the necessary primary outputs as described in this article. Name this project as MySetupProject.
2. Select MySetupProject in Solution Explorer and then press F4 key. This will open the Properties window.
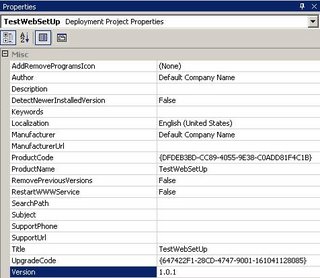
3. Note the Version property in the left column. Everytime a newer version of the application needs to be installed, increment the version number, say from 1.0.0 to 1.0.1 and so on.When you change this number and press enter, you will get the following prompt:

4. Click Yes on the prompt. You will notice that ProductCode property value (a GUID) is changed once you change the version number.
5. Now notice the RemovePreviousVersions property. This property is for specifying whether to over write the different versions or to have the different versions separately.
Making the RemovePreviousVersions to true means that every new version of your product will be over written.
Making this property to False gives you the flexibility to have both your older version and the newer version separately installed.
Thus by incrementing the Version and making RemovePreviousVersions to False you can have different versions of the same product running on your machine.
Now with this setup, we must also ensure that only a particular version that we need is used after deployment. The next article discusses on this topic of using a preferred version of your application after deployment.